

Builds an installable .fw for a BirdDog PLAY that adds an SSH key,
Tailscale, an NDI KVM endpoint, a USB media player, a UVC converter and a streaming gateway —
so a PLAY can be reached and managed remotely, can drive the machine it is displaying, can play
video, stills and PDFs off a USB stick, can turn a USB camera into an NDI, SRT or HDMI source, and
can take RTMP, RTSP, HLS, WebRTC and UDP streams onto its screen and send that camera back out the
same ways. It can also carry modules of your own.
The package is assembled entirely in your browser. Nothing is uploaded, no account is needed, and you do not need your existing firmware file — the generated package is a standalone overlay installer, not a modified copy of BirdDog’s firmware.
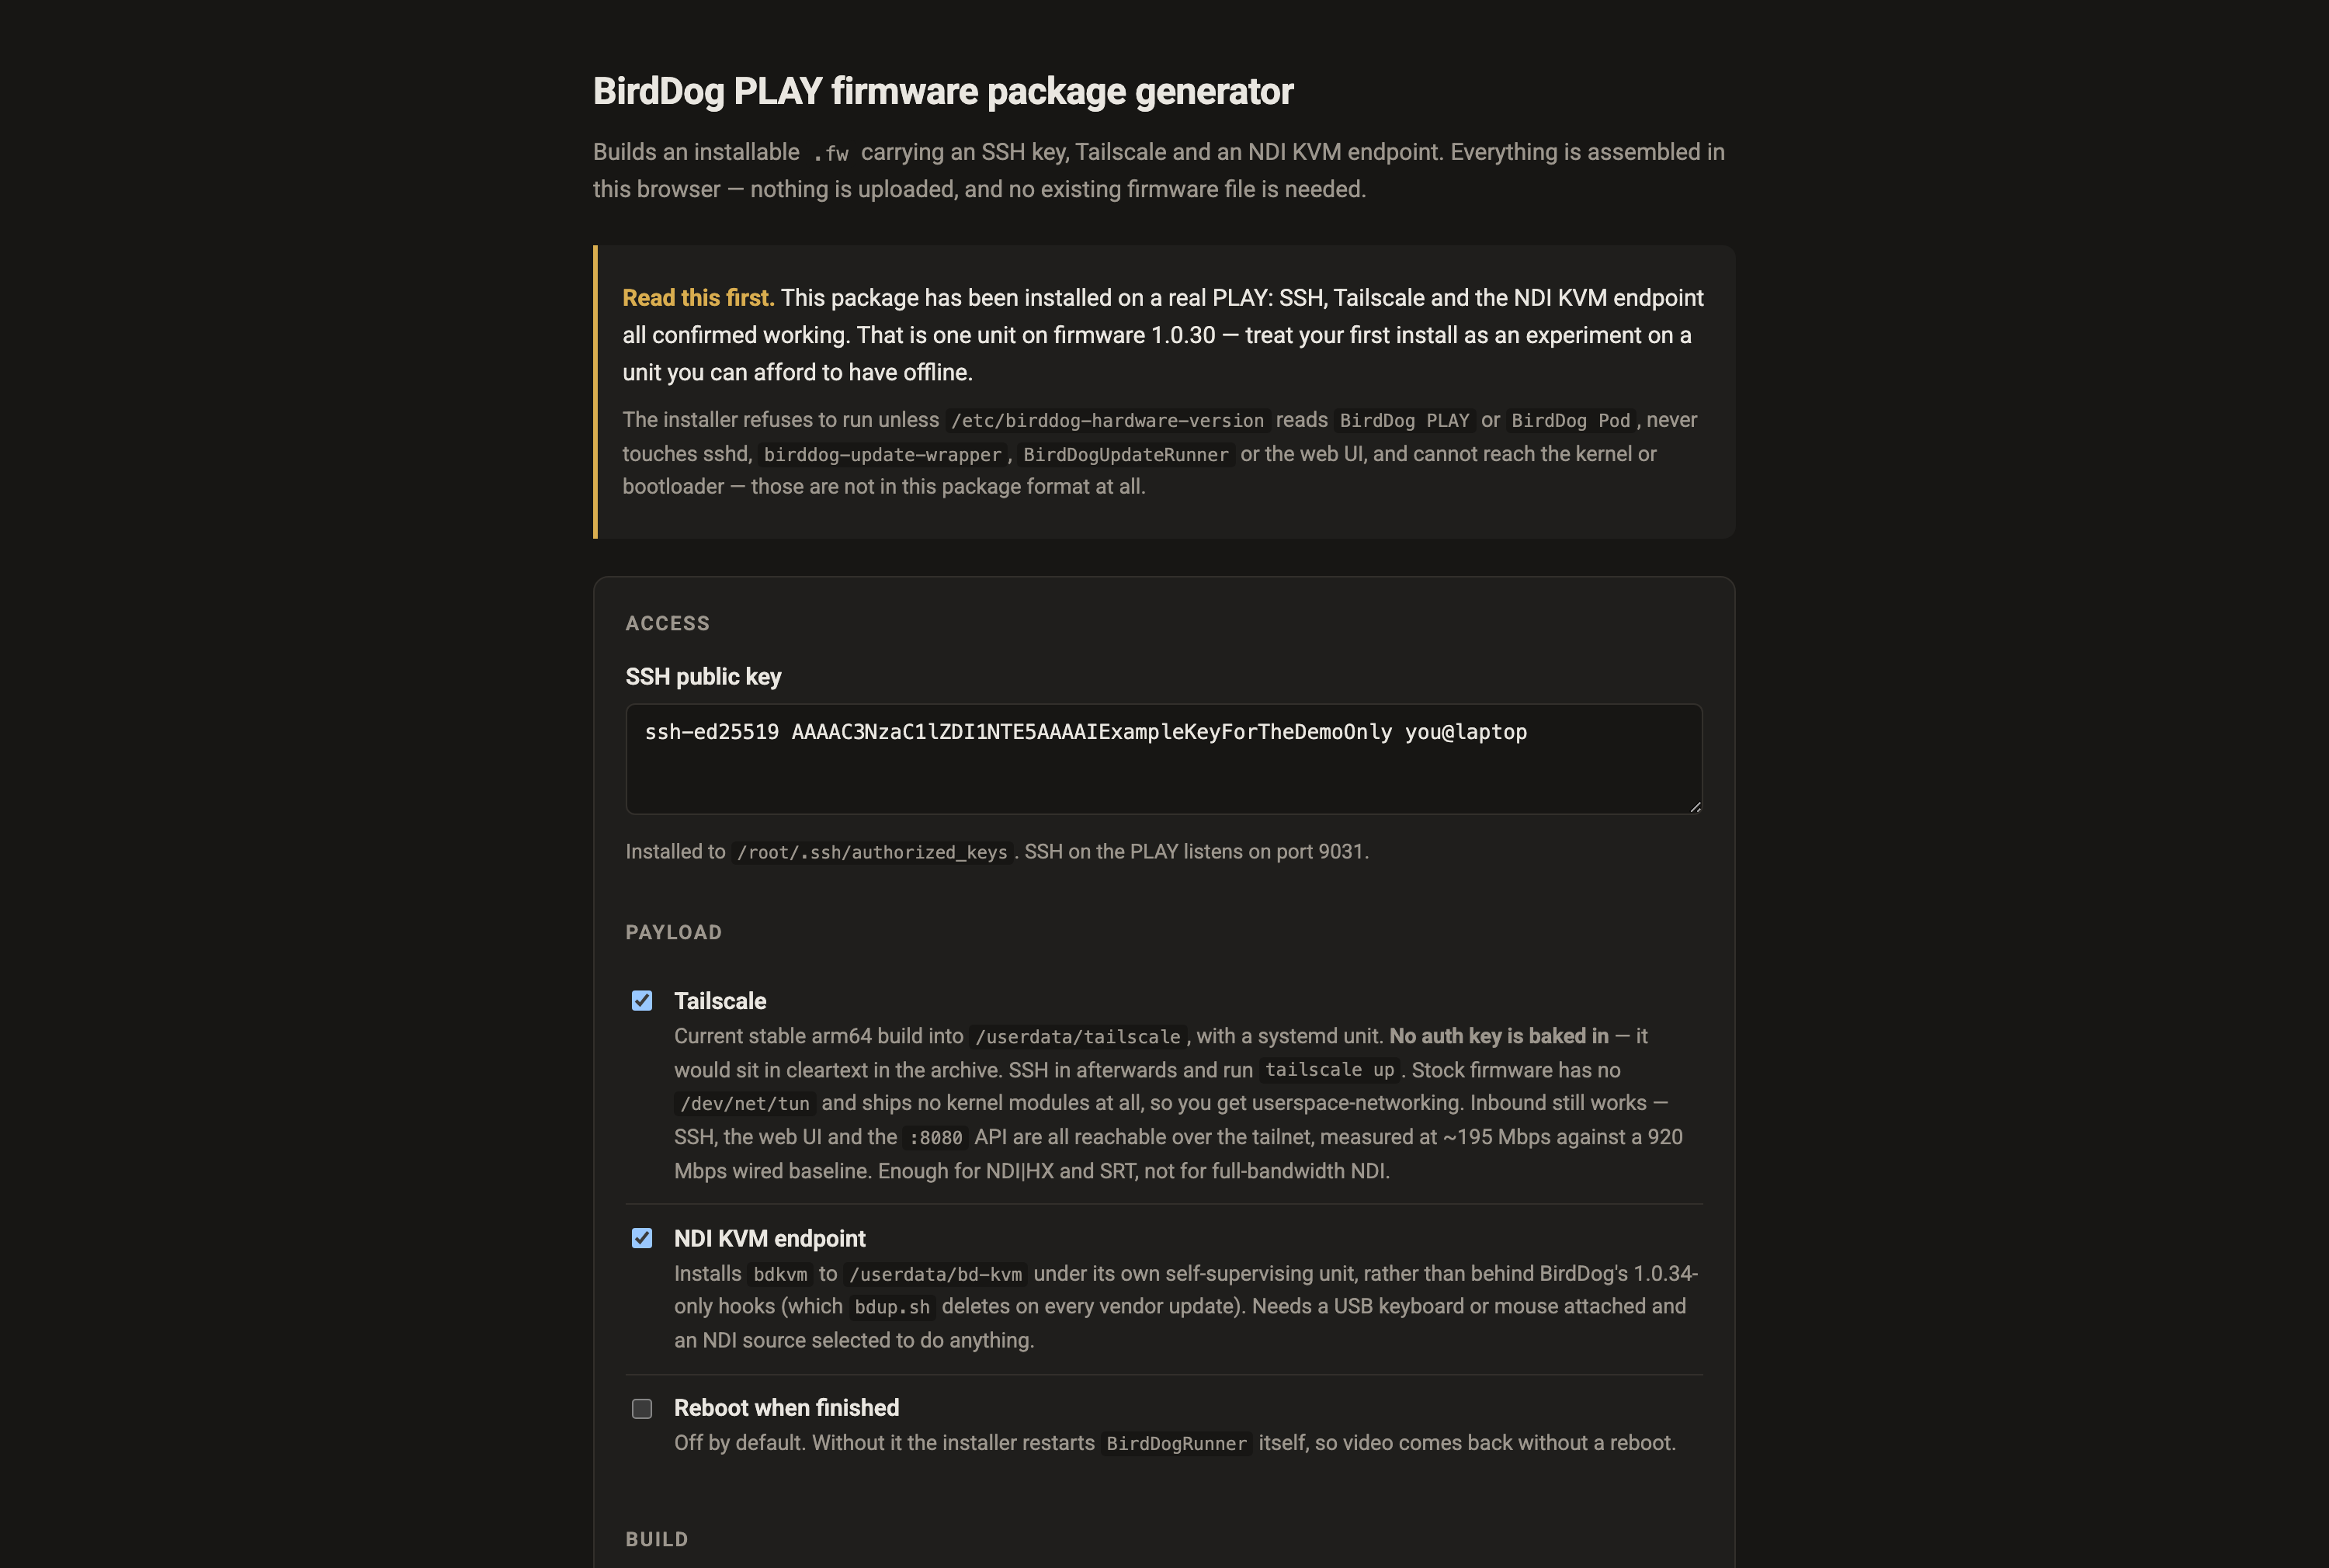
Before you rely on this: the package format was derived by static analysis of the stock updater, and the resulting package has been installed on a real BirdDog PLAY — SSH, Tailscale and the NDI KVM endpoint are all confirmed working on hardware, the media player and the UVC converter run on a test unit and are marked beta, and the archive writer is checked byte for byte against
tarin CI.That is one unit on one firmware version (1.0.30). It has not been tested across the range of PLAY and Pod firmwares in the field. Treat your first install as an experiment on a unit you can afford to have offline.
This codebase was created with AI assistance, directed and reviewed by a human author.
Building and installing a package
- Paste your SSH public key — the single line from your
.pubfile, startingssh-ed25519orssh-rsa. It is appended to/root/.ssh/authorized_keyson the device. The page refuses a private key, more than one line, or anythingsshdwould not load. - Choose the payload. Tailscale is on by default; the NDI KVM endpoint, the USB media player and the UVC converter are off. Each option says what it installs and, for the two beta ones, what is known to be rough. Reboot when finished is off by default — without it the installer brings the display back itself.
- Optionally add your own modules under Custom modules — see Custom modules.
- Build. The build tag names the file and is logged on the device. If you want to pin a
Tailscale version or build offline, supply
tailscale_<version>_arm64.tgzyourself; otherwise the current stable release is fetched and checked against its published SHA-256. - Download the
.fwand upload it on the PLAY’s web UI firmware page, exactly as you would a vendor release. The installer’s progress appears in the same live log, prefixed[custom]. - Read the first-boot report at
http://<play-ip>/static/bd-probe.txt. It works even if the SSH key did not take, and says whether/dev/net/tunexists, how much space is free, what is on the USB port, and which modules ran. Delete it when you are done:rm /srv/birddog-web-ui/static/bd-probe.txt— that path is served without authentication, which is exactly why the report carries hardware facts and nothing secret. - SSH in with
ssh -p 9031 root@<play-ip>. The full install log is at/tmp/bd-custom-install.log.
Why there is no upload and no decryption
BirdDog’s updater extracts the uploaded archive and runs its update script as root. There is
no signature check anywhere in that chain.
So a valid package is simply a gzipped tar with an executable update at the top level — and ours
is a readable bash script rather than a vendor binary.
That is the whole reason this tool can be a static page: there is no payload to decrypt and no key involved, so there is nothing to upload and nothing to protect server-side. The only server-side component is a proxy for Tailscale’s download host, which sends no CORS header.
This project contains no BirdDog firmware, no vendor keys, and no way to decrypt one.
Read the installer before you run it. It is 500 lines of commented bash, it runs as root on your device, and you should not take anyone’s word for what it does.
What gets installed
| Path | What | Survives a vendor firmware update? |
|---|---|---|
/root/.ssh/authorized_keys |
your key, appended, mode 600 | yes — the vendor installs additively |
/userdata/tailscale/ |
tailscaled + tailscale, 68 MB |
expected, but not guaranteed |
/userdata/bd-tailscale-ui/ |
the Tailscale panel for the web UI’s System page | expected |
/userdata/bd-kvm/ |
the KVM agent | yes — deliberately not the path the vendor updater deletes |
/userdata/bd-play/ |
the USB media player, PDF renderer and exFAT helper | expected |
/userdata/bd-cam/ |
the UVC converter and its settings API | expected |
/userdata/bd-gw/ |
the streaming gateway: MediaMTX, its panel and its settings | expected |
/userdata/bd-<name>/ |
each custom module, by convention | expected |
/etc/systemd/system/bd-*.service |
units | yes |
/userdata/bd-probe.txt |
first-boot hardware report | yes |
/userdata/bd-modules.log |
one line per custom module the installer ran | yes |
Everything substantial lives on the /userdata partition. The installer:
- refuses to run unless the device identifies itself as a BirdDog PLAY or Pod;
- never touches
sshd, its config, the update wrapper, the update runner or the web UI — those are how you get back in if something goes wrong; - cannot reach the kernel or bootloader, which are not in this package format at all, so a bad install cannot break the boot chain;
- is idempotent, and does not reboot unless you ask it to.
Three options edit one web UI page, videoset.html, to add themselves to it: the media player’s
USB source, the converter’s UVC Converter tab and the gateway’s Streaming tab. Each edit is marker-wrapped, backed up
beside the file and exactly reversible, and the installer restarts the web UI afterwards, checks
it came back as a new process and answers, and rolls the edit back if it did not. The Tailscale
panel does the same to the System page.
Tailscale
Installed but not authenticated — no auth key is baked into the package, because it would sit
in cleartext both in the archive and on the device. Instead the package adds a Tailscale panel to
the System page of the PLAY’s own web UI: open it in a browser, start the login, and follow the
link it shows. Changing anything there needs a web UI login; reading status does not. If you
prefer, SSH in on port 9031 and run
/userdata/tailscale/tailscale --socket=/run/bd-tailscaled.sock up instead.
Stock PLAY firmware has no TUN device and ships no kernel modules, so Tailscale runs in userspace-networking mode. Inbound still works — SSH, the web UI and the API are all reachable over the tailnet, because the daemon proxies inbound connections to local listeners. The node cannot advertise routes or act as an exit node, and the panel says so rather than offering switches that would fail.
Measured throughput is ~195 Mbps against a 920 Mbps wired baseline: comfortable for NDI|HX and SRT, not enough for full-bandwidth NDI.
Before you put a PLAY on a tailnet: its REST API on port 8080 has no authentication of any kind and allows any origin. Joining a tailnet does not change that — anyone who can reach the device on the tailnet can reconfigure it without credentials. Scope an ACL for the node; the device has no access control of its own to fall back on.
NDI KVM
A small agent reads the keyboard and mouse on the PLAY’s USB-A port and forwards them to the NDI source the PLAY is displaying, as KVM metadata.
It opens its own receiver at metadata-only bandwidth, so it costs nothing on the wire and coexists with the PLAY’s own receiver. It needs a keyboard or mouse attached and an NDI source selected to do anything, and it polls for hotplug itself — no vendor hooks are relied on, because those are a 1.0.34 feature that a vendor update deletes anyway.
It uses the free NDI SDK only, and loads the device’s existing library at runtime rather than linking it — so no NDI code is redistributed.
USB media player (beta)
Adds a USB entry to the source dropdown and plays video, stills and PDFs off a USB stick,
hardware-decoded straight to HDMI — in order or shuffled, looping until you stop it. Control it
from that page, or from http://<play-ip>:8091/. Selecting USB stops BirdDog’s decoder to take the
display; switching back to NDI restores it.
Why beta: repeatedly switching between USB and NDI destabilises BirdDog’s own decoder — it restarts each time and the player checks it came back, but expect the odd dropout if you flick between sources constantly; treat USB as a mode you set. Playback has been proven from internal storage and a loopback exFAT volume, not yet with a physical stick hotplugged. PDF needs the PDFium helper and exFAT sticks need the FUSE helper; the page says which of those your build carries.
UVC converter (beta)
Turns the PLAY into a converter the other way round: a USB camera on its USB-A port, out as
NDI, NDI|HX, SRT or HDMI — any combination, from one capture. Settings live in a
UVC Converter tab in the web UI, or on http://<play-ip>:8090/. A UVC 1.5 camera is bound
automatically; this kernel’s driver ignores 1.5 devices silently otherwise.
Why beta: every claim is measured on one test unit and one camera. NDI|HX uses a packet layout reconstructed from documentation rather than a header, so a future NDI runtime could change it — the symptom would be a picture fault. And at heights that are not a multiple of 16, 1080 among them, the bottom 8 rows show as a green band, because the decoder ignores the crop the standard puts in the stream.
Streaming gateway (beta)
Makes the PLAY a streaming endpoint in both directions. In: push RTMP from OBS, vMix or an
encoder to rtmp://<play-ip>:1935/live, pull an RTSP camera or an HLS playlist, publish WHIP from
a browser, or receive MPEG-TS or RTP over UDP — and choose which of them is on the HDMI output.
Out: the UVC converter’s camera served over RTSP, RTMP, HLS, WebRTC and SRT, and pushed to
YouTube, Twitch or any RTMP(S), RTSP, SRT or WHIP destination. Everything is set up on a
Streaming tab in the web UI (or the same API on http://<play-ip>:8093/), which needs your
birdUI login because it holds stream keys.
The box runs MediaMTX as the hub. The picture reaches the
screen through the PLAY’s own decoder, which the tab points at the chosen path as an SRT source
on loopback — so the OSD, tally and the rest of the web UI carry on as before, and if the hub
stops, the PLAY simply behaves like a PLAY. To put the camera on the hub, set the UVC converter’s
SRT destination to the address the Streaming tab prints (srt://127.0.0.1:8890?streamid=publish:cam).
Why beta: this option has not yet run on a PLAY. What it relies on is read out of the
firmware and measured by the projects beside it, and its configuration is checked against the real
MediaMTX in CI, but the decoder reading the hub’s SRT over loopback is unproven until the test unit
is back. Ports 1935, 8554, 8888, 8889 and 8890/udp are open with no credentials, exactly like
the stock API on :8080 — the LAN or the tailnet is the boundary. The decode limits are the chip’s:
H.264 to 1080p60 or 2160p30, HEVC to 2160p60; WebRTC publishers must send H.264. YouTube refuses
video without audio, and the converter has none yet.
Custom modules
Under Custom modules you can add your own payloads. A module is a small .tgz holding a
module.conf (its name and version) and an install script; the page reads it in your browser,
checks that it is well-formed, and writes it into the package at modules/<name>/. On the device,
the installer runs each module’s install as root, after the payloads above.
Nothing about what install does is checked — only that the archive is one the package
format and the device can carry. Read what you package. Each chosen file is listed with a tick or
the reason it was refused, and a refused file blocks the build rather than being dropped quietly.
A module that fails, exits non-zero or hangs cannot leave the unit dark: the installer runs each
one on its own, stops it after ten minutes (Debian’s timeout, which stock PLAY firmware carries;
without it a hang is not caught), logs the failure and carries on, so the step that restarts
BirdDog’s display still runs. What that cannot contain is a module that deliberately reboots,
stops the display without restarting it, or kills the updater — it runs as root, and only reading
it protects you from that. What every module printed is in /tmp/bd-custom-install.log on the
device, and the probe report ends with one line per module and its exit code.
To write one, start from the template at
github.com/stoatworks-labs/bd-play-module-template
and read Building a module on the site. A module built from the template can be removed with
bash /userdata/bd-<name>/uninstall over SSH.
Undoing it
Over SSH, in this order — the first line puts the System page back exactly as it shipped, and the
pristine copy is also kept beside it as settings.html.bdts-stock:
/userdata/bd-tailscale-ui/bdts --unpatch-ui && systemctl restart BirdDogWebUI
systemctl disable --now bd-tailscaled bd-kvm bd-tailscale-ui
rm -rf /userdata/tailscale /userdata/bd-kvm /userdata/bd-tailscale-ui /etc/systemd/system/bd-{tailscaled,kvm,tailscale-ui}.service
The media player and the converter restore their page edits with bdplay -unpatch-ui and
bdcam --unpatch-ui; a module built from the template leaves bash /userdata/bd-<name>/uninstall.
For the gateway, clear Show on HDMI in its tab first so the decoder is handed back, then
/userdata/bd-gw/bdgw --unpatch-ui && systemctl restart BirdDogWebUI,
systemctl disable --now bd-mtx bd-gw and rm -rf /userdata/bd-gw /etc/systemd/system/bd-{mtx,gw}.service.
Then reflash stock firmware if you want a clean unit. Recovery-mode flashing of the factory image
is a proven path, but it restores factory state — not this unit’s provisioned serial, hostname
or /userdata.
If something is wrong
| Symptom | Cause |
|---|---|
| The installer refused to run | The device does not identify as a PLAY or Pod. That check is deliberate. |
| The screen went dark after the upload | The vendor’s update wrapper stops the display before running any installer. Ours restarts it when it finishes; wait for the log to say so. If it stays dark, power-cycle — nothing here can touch the boot chain. |
| Tailscale is installed but the device is not on the tailnet | It is not authenticated — no auth key ships in the package. Sign in from the Tailscale panel on the System page, or bring it up over SSH. |
| Full-bandwidth NDI is unusable over the tailnet | Userspace networking tops out around 195 Mbps. Use NDI |
| The KVM agent does nothing | It forwards to the source the PLAY is displaying, and needs a keyboard or mouse on the USB-A port. Check what is on screen and what is plugged in. |
| A USB stick does not mount | An exFAT stick needs the FUSE helper, which the page says whether your build carries. FAT32 and NTFS mount without it. |
| A stream is pushed to the PLAY but nothing is on screen | Pick the path under Show on HDMI on the Streaming tab and press SWITCH — the decoder is only pointed at a path when you ask. If the tab shows the publisher connected and the screen stays black, the codec is outside the chip’s limits (H.264 above 2160p30, or VP8/VP9/AV1 from a browser). |
| The Streaming tab says the device has no password | Set a birdUI password on the System page; the tab refuses to hold stream keys behind a login that anyone can pass. |
| A USB camera never appears | A UVC 1.5 camera is bound automatically by the converter; anything else, check bd-probe.txt for the USB topology and journalctl -u bd-cam. |
| A vendor update removed something | /userdata/tailscale is expected to survive but is not guaranteed; the KVM path is deliberately placed where the updater does not delete. |
| A module file is refused | The message says why: a path over 100 bytes, a symlink, a binary that is not aarch64, a name that collides with a built-in payload, or no install at the root. Fix the module or remove the file; the build will not silently leave it out. |
| A module installed but its service is not running | Its install reported a warning rather than failing the firmware install. Read /tmp/bd-custom-install.log and journalctl -u bd-<name> on the device. |