

A luminance keyer for Resolume Arena and Avenue, as an FFGL effect.
It measures the perceptual (Rec. 709) luminance of each pixel and drives that pixel’s alpha from it — so dark areas of a clip become transparent and let lower layers show through. It is the quick way to key a black background, tame add-blend-style content, or pull a shadow or highlight matte, without needing a dedicated key colour.
Status: released at v1.3.4, and run inside Resolume on real content. Needs Resolume Arena or Avenue 7.3.1 or newer. The same key now also builds for OpenFX hosts and for After Effects and Premiere Pro — see below for where each one goes. The before/after image below is rendered with the plugin’s exact shader maths rather than captured from Resolume.
Installing
Drop the plugin into Resolume’s plugin folder and restart it:
macOS    ~/Documents/Resolume Arena/Extra Effects/
Windows  %USERPROFILE%\Documents\Resolume Arena\Extra Effects\
Avenue uses the same layout under its own folder name. It appears in the effects list as Luma Key.
There is also a macOS disk image and a Windows installer in the release, which put the plugin where the host looks without you copying anything.
The macOS builds are Developer ID-signed and notarised — FFGL, OpenFX and Adobe alike — so
there is nothing to clear and no xattr step. The Windows builds are not code-signed. Plugin
files are not gated the way .exe files are, so a host loads them normally; it is only the
installer that trips SmartScreen, once: More info → Run anyway. Checksums and the
per-artefact detail are in UNSIGNED.md.
After Effects and Premiere Pro — beta
The same key builds as an After Effects plugin, which Premiere Pro loads too. Take the
luma-key-adobe-* zip for your platform and copy the plugin into the shared Adobe folder, then
restart the host:
macOS    /Library/Application Support/Adobe/Common/Plug-ins/7.0/MediaCore/   (LumaKey.plugin)
Windows  C:\Program Files\Adobe\Common\Plug-ins\7.0\MediaCore\            (LumaKey.aex)
That folder is root-owned on macOS, so the copy needs an administrator password. The effect appears under Effects → Stoatworks → Luma Key.
It is called beta because it is the newest of the builds, not because the maths differs — the key is the same and the bundle is verified, it has simply had less time in real hosts than the FFGL and OpenFX builds have. One thing worth knowing if a result looks inverted in the two hosts: Premiere’s legacy render path hands over pixels as BGRA where After Effects uses ARGB, and the plugin swaps its luminance weights to match, so the two agree.
OpenFX hosts (Resolve, Vegas, Nuke, Natron)
Luma Key also ships as an OpenFX plugin — same effect, same controls. Copy
LumaKey.ofx.bundle from the -ofx- download into the OpenFX folder and
restart the host:
macOS    /Library/OFX/Plugins/
Windows  C:\Program Files\Common Files\OFX\Plugins\
Linux    /usr/OFX/Plugins/
The two controls
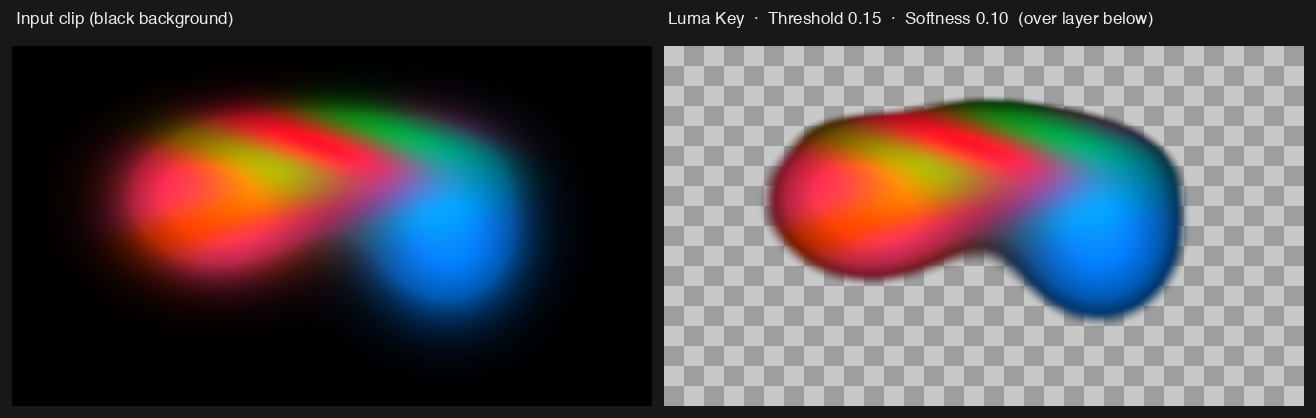
Threshold 0.15, Softness 0.10 — the defaults.
| Parameter | Default | What it does |
|---|---|---|
| Threshold | 0.15 | The luma level at the centre of the key edge. Pixels darker than this are keyed out. |
| Softness | 0.10 | The width of the soft edge around that threshold. 0 is a hard cut; higher is a gradual falloff. |
| Invert | Off | Flips the key so bright pixels are removed instead of dark ones. |
The thing worth internalising: Threshold is the middle of the ramp, not its start. Raising Softness widens the transition around the threshold in both directions, so a high Softness with a low Threshold will start eating into midtones. If a key is biting too far, lower Softness before you touch Threshold.
Getting a clean key
- Set Softness to 0 first. A hard cut shows you exactly where the threshold is landing; softness only obscures that while you are still deciding.
- Raise Threshold until the background is gone and no further. Watch the darkest parts of the subject you want to keep — they go next.
- Then add Softness, just enough to lose the stair-stepping on the edge.
For a highlight matte, turn Invert on and repeat: the same procedure, working down from white.
How it composites
The effect works on straight (unpremultiplied) colour internally and outputs premultiplied colour clamped to the LDR range, matching Resolume’s own pipeline — so it composites cleanly with the layers beneath it rather than leaving dark or bright fringes on the soft edge.
This is why it behaves properly on the soft part of the key and not just the hard part, which is the usual failure of a naive luma key.
What it is not
- Not a chroma keyer. There is no key colour; it only looks at luminance. A green screen needs a chroma keyer.
- Not a spill suppressor. It changes alpha, not colour.
- Not a garbage matte. Every pixel is judged on its own luminance, with no spatial awareness — a bright object against a black background keys well, and a bright object against a bright background does not key at all.
Audio reactivity
Both controls are plain floats, so Resolume can drive them from its own audio analysis — the dropdown beside the parameter, then FFT, a band and a gain.
Threshold on the low band is a genuinely useful trick: the key opens with the music, so a bright graphic over a clip appears on the hits and sinks back between them. Set Threshold so the graphic is just barely keyed out at silence, and let the FFT push it over. A little Softness keeps the arrival from strobing.
Troubleshooting
| Symptom | Cause |
|---|---|
| Plugin doesn’t appear in Resolume | Wrong folder, or Resolume older than 7.3.1. On macOS, check quarantine on the bundle itself. |
| Key eats into the subject | Threshold is the centre of the ramp — lower Softness before lowering Threshold. |
| Edges are stair-stepped | Softness is at or near 0. |
| Dark fringe on the soft edge | Shouldn’t happen — the output is premultiplied to match Resolume. Worth reporting. |
| Nothing keys at all | The background may not be dark. Try Invert, or check the clip actually has the luma range you think. |
| Keyed the wrong end of the range | That is what Invert is for. |
See also
- README — parameters, build instructions and downloads
- UNSIGNED.md — Gatekeeper and SmartScreen