

Hyacinth is shallow depth of field, bokeh and lens flare for Resolume Arena and Avenue: one FFGL effect, SW Hyacinth. It gives every pixel of your clip a depth, focuses a lens at one distance and lets the rest of the picture fall out of focus, the way a fast lens does. The highlights in the out-of-focus parts turn into the aperture’s shape: seven-bladed discs, a mirror lens’s rings, stars or hearts. Or leave the picture sharp and add only the bokeh. On top of either you can have floating orbs, lens flare and dirt on the glass, all drawn with the same aperture.
Your clip doesn’t come with a depth, so Hyacinth makes one up. It can be a floor running away to a horizon, distance from a point, brightness, haze, or “whatever looks like the thing I’m focused on”. Or you can give it a real depth map, packed beside the picture. Focus can sit at a set distance, at a point you pick, or on something the tracker follows round the frame.
The name is a long way round: Hyacinth Bucket insisted it was pronounced “Bouquet”, and bouquet is nearly bokeh.
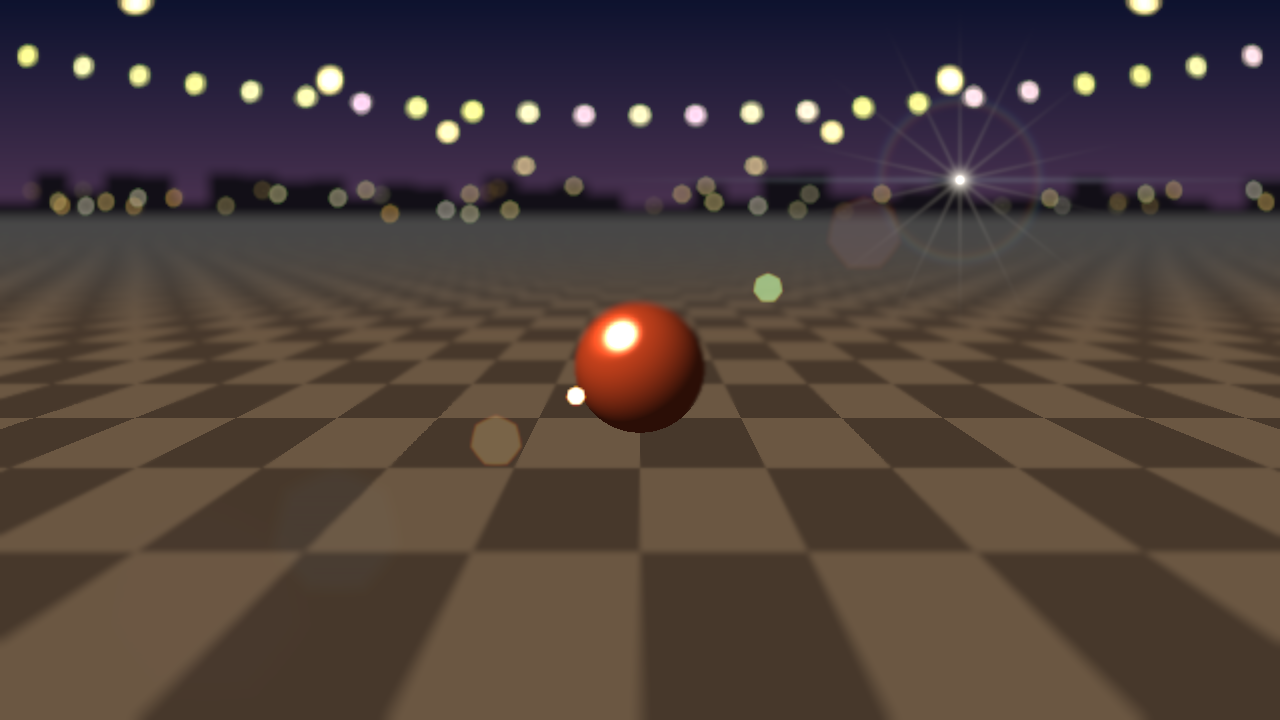
Rendered by hytest, the offline harness, not captured from Resolume. Its own test street, the
focus on the ball, a flare from one light, and the defaults otherwise.
Before you rely on this: it’s at v0.1.0, the first release, and very early days. Its behaviour is measured rather than asserted, by a harness (
hytest) that drives the plugin’s own code in a headless GL context on one Apple Silicon Mac (macOS 26), at 1280×720 and 320×180 and again on Apple’s software renderer. A defocused point’s disc is the size a thin lens says, to 0.03 px. It carries its highlight’s light to within 0.4 %, whatever the aperture’s shape. The blade corners point where the blades are, upside down in front of focus. A ground plane’s depth matches a pinhole camera’s to three parts in ten million. The tracker follows a moving subject to 0.06 px. At zero Mix the clip comes through bit for bit. Sixteen models that are wrong on purpose and 21 one-character changes to the shipped code are all caught, and all 42 controls measurably change the picture. It’s never been loaded into Resolume on macOS. The one host it has run in on a Mac is the fleet’s own test host,oxbow, for 120 frames. On Windows it has been in Resolume: the release workflow’s own build, in Resolume Arena 7.27.1 on a test machine with no GPU (software rendering). It registers, all 47 of its parameters arrive as declared, it renders, Arena’s log stays clean, and every control that can act on a still picture changed Arena’s picture. Focus Speed, which sets how fast the focus moves, can’t be judged on a still. Nobody has held it up next to a real lens’s picture yet. Try it on a spare layer before you put it in a show.This codebase was created with AI assistance, directed and reviewed by a human author.
Installing
Every download carries one effect, SW Hyacinth (Hyacinth.bundle on macOS, Hyacinth.dll on
Windows). Drop it into Resolume’s effects folder and restart Resolume:
macOS    ~/Documents/Resolume Arena/Extra Effects/
Windows  %USERPROFILE%\Documents\Resolume Arena\Extra Effects\
Avenue uses the same layout under its own folder name. The effect then shows up in the effects browser as SW Hyacinth.
The macOS download is a universal build (Apple silicon and Intel), as a .dmg or a .zip. It’s
Developer ID-signed and notarised by the release pipeline after publication, so the bundle
just loads. If macOS refuses a download, it’s from before the signing, so download it again. The
Windows download is an x64 installer or a .zip. The installer is for you alone, so it asks for
no administrator password, and it starts on Arena’s Extra Effects folder (Avenue’s, if only Avenue
is there); its folder page names both, if you want the other. Hyacinth.dll goes in that folder,
and its README, notices and uninstaller in a Hyacinth folder beside it, where Resolume pays them
no attention. Quit Resolume first. It isn’t code-signed, so it trips SmartScreen once: More
info → Run anyway. Or skip the installer, take Hyacinth.dll out of the .zip and drop it
into the folder by hand.
Start here
- Put SW Hyacinth on a clip. Something shot over a floor, a road or a stage is best to begin with, because the default depth is a ground plane.
- Out of the box the ground is sharp a little below the middle of the frame and goes soft in front and behind, and the bright spots in the soft parts become seven-bladed discs.
- Drag Focus Y up and down. The sharp band follows it, easing into place over a fifth of a second.
- Turn Blur Size up for a faster lens, down for a slower one.
- Change Show to Depth to see the depth it’s using (white near, the focused distance marked), then back to Picture.
- Change Mode to Bokeh Only: the picture comes back sharp and only the bokeh discs stay.
If the picture doesn’t seem to change at all, the clip may have no bright spots and no depth worth blurring at these settings: see If it looks wrong.
How the blur is made
A lens focused at one distance blurs a point at another into a disc, the circle of confusion. Its radius isn’t proportional to how far the point is from the focused distance. It’s proportional to the difference in their nearness, 1 over the distance. So Hyacinth keeps every depth as nearness, from 1 (the nearest thing in the scene) to 0 (infinity), and the blur is
radius = Blur Size × (nearness − the focused nearness)Most of what you’ll see falls out of that:
- The background’s blur levels off, the foreground’s doesn’t. Twice the focus distance away, a point already has half the blur it will have at infinity. Nearer than focus, the blur keeps growing, so a hand in front of the lens is a smear.
- A defocused highlight is the aperture, with the highlight’s light spread over it. A big disc is dim and a small one bright, so the total light stays the same.
- In front of focus the aperture is upside down. A heart is the wrong way up, and a seven-bladed disc points down instead of up.
- Towards the corners a disc becomes a cat’s eye, clipped by the lens barrel.
- A sharp thing hides the blur behind it, but a blurred thing in front spreads over a sharp one, as with a real lens.
- Colour fringes swap sides across focus: magenta rims in front, green behind.
Video clips everything at white, so the bright spots in a clip have lost most of their light. Hyacinth puts some back (Highlights) before it blurs, or a streetlight would defocus into a grey smudge rather than a bright disc. Everything is worked out in linear light, then encoded for the screen.
The Lens group
Mode is Depth of Field (the picture defocused by depth, its highlights as bokeh) or Bokeh Only (the picture left sharp, with its highlights’ bokeh drawn over it). Bokeh Only is the “sparkle without the blur” setting: the depth and focus still decide how big each highlight’s disc is.
Blur Size is how fast the lens is: the disc’s radius for the biggest nearness difference there can be, from 0 to 8 % of the frame’s height. The default is 3 %.
The Depth group
Depth From picks where the depth comes from:
- Plane: a flat surface running away to a horizon, such as a floor, a road, a table top or a wall. Plane Angle says which way it comes towards you (270°, the default, is the ground, nearer at the bottom of the frame; 90° is a ceiling, 0° a wall nearer on the right). Horizon says where it reaches infinity, from the frame’s far edge (0) to its near edge (1). The default puts it three tenths of the way down from the top.
- Radial: nearest at the focus point and receding all round it, reaching infinity at Radius (0.1 to 3 frame heights). It suits a subject in the middle.
- Luma: bright is near. Turn on Depth Invert for bright is far, which suits a lit stage against a dark backdrop the other way round.
- Haze: haze and fog thicken with distance, so the hazier a part of the picture looks, the farther away it’s taken to be. It suits landscapes, smoke and fog.
- Subject: whatever looks like the thing at the focus point is near, and the rest is far. “Looks like” is by colour, so it works best when the subject’s colours differ from what’s round it. Put Focus X and Focus Y on it, and set Track Size to about its size.
- Clip Alpha: the clip’s alpha is the depth, white near.
- Side by Side and Over Under: the clip is a picture and a depth map packed together, the picture on the left or top and the depth (white near) on the right or bottom. A depth map made elsewhere, for example by running a depth-estimation model over the clip beforehand, beats every estimate above. The output is the picture half, stretched to fill the frame.
Depth Edges snaps an estimated depth (Haze and Subject) to the picture’s own edges, so the blur stops where the subject stops rather than in a soft halo round it. It’s a radius, 0.5 to 8 % of the frame’s height (2.5 % by default). Bigger smooths the depth more but follows fine edges less.
Depth Invert swaps near and far, for any source.
The Focus group
Focus picks what’s sharp:
- Manual: the nearness in Focus Depth, 0 (infinity) to 1 (the nearest thing).
- Point (the default): the depth at Focus X, Focus Y, so you focus by pointing.
- Track: the depth of whatever was at the focus point when tracking started, followed as it moves round the frame.
Track grabs what’s under the focus point when you switch to it, when you move Focus X or Y, and when you press Grab. Track Size is the size of the patch it follows, 4 to 40 % of the frame’s height (15 % by default): about the size of the subject is right. Set Show to Tracker to see the box: green while it’s sure, amber when it’s less sure, red when it has lost the subject and is holding still. Press Grab to start again.
Focus Speed is how long a focus pull takes to settle, from instant to two seconds. It eases in the way a focus puller’s hand does, quickly at first then slowing (an exponential with that time constant), so automating Focus Depth or moving the focus point gives a pull, not a jump. The default is a fifth of a second. It runs on wall-clock time, whatever the frame rate.
The Aperture group
Shape is the aperture a defocused highlight takes:
- Iris: Blades straight-edged blades (3 to 12, seven by default), rounded by Blade Curve (0 is straight, 1 a circle), turned by Iris Rotate.
- Mirror: a mirror lens’s ring. The secondary mirror blocks the middle, so every highlight is a doughnut.
- Star and Heart: a cut-out in front of the lens.
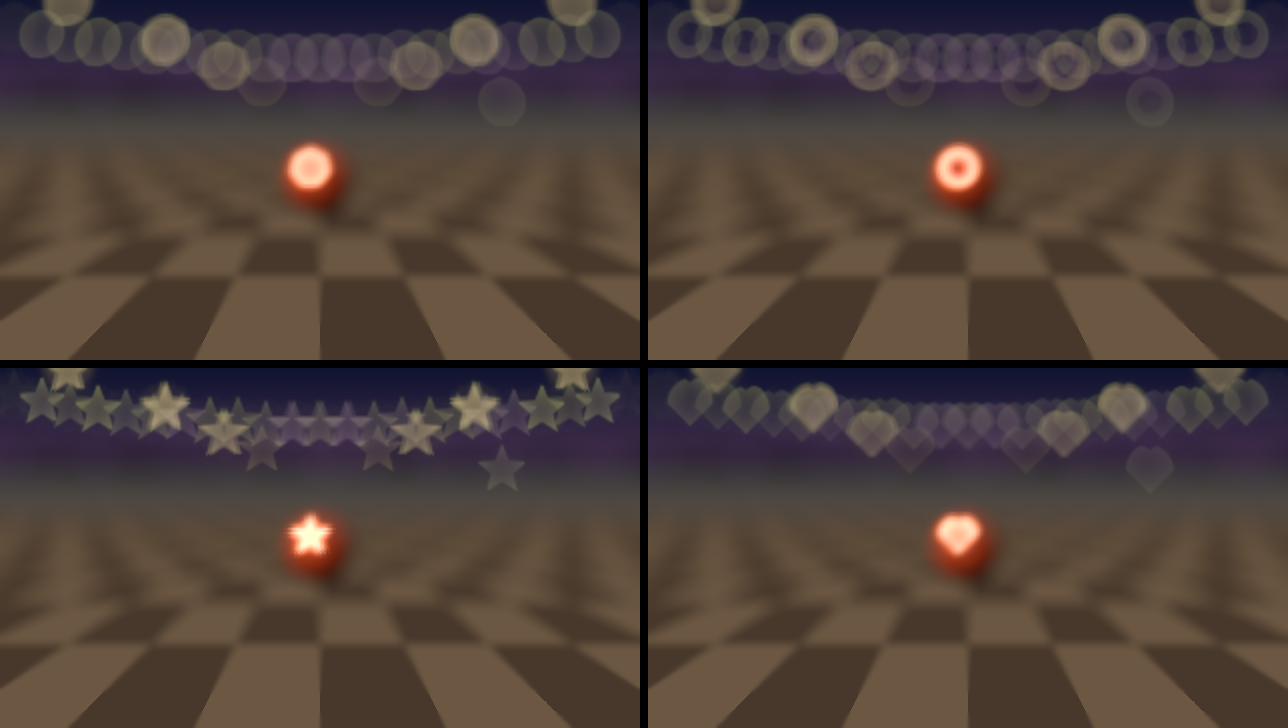
Shape: Iris (seven blades), Mirror, Star and Heart, everything out of focus. Rendered by
hytest.
Then the lens’s faults, which are what make bokeh look like a real lens’s:
- Cat Eye: the barrel’s shadow. Towards the corners the discs are clipped into a cat’s eye; at 1 a corner’s disc is cut to half its width.
- Swirl: field curvature. The corner discs narrow towards the centre, so the background seems to swirl round the subject. At 1 a corner’s disc is 40 % narrower one way than the other.
- Squeeze: an anamorphic lens’s tall ovals, 1 (round) to 2 times as tall as wide.
- Bubble: spherical aberration, −1 to +1. Positive brightens the rim of the discs behind focus (the “soap bubble” look) and the middle of the ones in front; negative does the opposite. It moves light within a disc, never adds or takes it away.
- Onion Rings: the fine concentric rings polished aspheric elements leave in a disc. They only show on discs big enough to draw them.
- Fringe: chromatic aberration. Red and blue focus at a slightly different distance from green, so the discs grow magenta rims in front of focus and green ones behind.
The Highlights group
Highlights is how much brighter than white the brightest parts of the scene really were, a gain from 0 to 32 (8 by default). Video stores a streetlight and a white shirt at the same value, so without this the light would defocus into a dull smudge. Turn it up for brighter, more distinct discs; down to 0 for no added light at all.
Threshold is where a highlight starts, as a code value (0.75 by default). Above it the light is put back and drawn as aperture-shaped discs; below it the picture is just blurred. Lower picks up more of the picture as highlights, higher keeps only the brightest. Brightness is the brightest of the three channels, so a red lamp counts as a light.
The Orbs group
Orbs are lights that aren’t in the picture: out-of-focus lights far behind the subject, scattered across the frame and drifting. Orbs is how bright they are (0, off, by default), Orb Count how many (0 to 400), Orb Size their radius (1 to 15 % of the height) and Orb Drift how fast they move (up to 0.2 frame heights a second). Each takes its colour from the picture where it is, and they twinkle slightly.
Orbs sit at infinity, so a sharp subject in front hides them, and their size is their own rather than Blur Size’s, so they stay as you set them while the focus moves.
The Flare group
Flare turns the lens flare up from 0 (off, by default). Flare From says what the light is:
- Highlights: every bright, compact spot in the picture.
- Light: one light at Light X, Light Y that the picture doesn’t have, such as the sun just out of frame.
- Tracked: that same light, stuck to whatever the tracker is following.
Then the parts of it:
- Ghosts: reflections between the lens’s surfaces, in the aperture’s shape, on the line from the light through the middle of the frame. They move the opposite way to the light.
- Halo: a ring round the light.
- Starburst: spikes off the light, one along each blade edge’s normal. Six blades give six spikes, seven give fourteen, and a round aperture gives none.
- Streak: an anamorphic lens’s horizontal line through the light.
- Dirt: specks and smudges on the front element, which only show where light falls on them.
The flare’s geometry is physics: where the ghosts lie, their shape and the spike count. How bright each part is, is taste.
The Output group
Show is Picture (the effect), Depth (nearness as grey, white near, with the focused distance marked in orange), Blur (the circle of confusion: green where it’s sharp, red in front of focus and blue behind, brighter for more blur) or Tracker (the picture, with the tracker’s box and the focus point). Depth and Blur are the quickest way to find out why something is or isn’t sharp.
Mix fades between the clip and the effect. At 0 the clip comes through untouched.
Recipes
A portrait over a stage. Depth From Plane, Focus Point on the performer’s feet, Blur Size about halfway. The stage behind them goes soft and the lights become discs.
A face in the middle. Depth From Radial, Focus Point on the face, Radius about 0.5. Or Depth From Subject with Focus X and Y on the face and Track Size about its size, if its colours stand out.
Follow a performer. Focus Track, the focus point on them, Track Size about their size. Check it with Show Tracker, and press Grab if the box wanders off.
Sparkle on a concert shot. Mode Bokeh Only, Blur Size at its top, Highlights up, Threshold down a little. Everything stays sharp and the lights grow discs.
A dreamy background. Shape Iris, Blade Curve 1 (round), Bubble at about +0.8, Cat Eye at about 0.6 and Swirl at about 0.5.
Anamorphic. Squeeze 2, Flare up, Streak up, Flare From Highlights.
The sun off frame. Flare From Light, Light X and Y just outside a corner, Ghosts and Halo up, a little Dirt.
A rack focus. Focus Manual and Focus Speed about 1 s, then switch Focus Depth between two values on a cue: the focus eases from one to the other.
Performance
Measured on an Apple M4 Max with the plugin’s own bench (hytest --bench), the median GPU time a
frame:
| 720p | 1080p | 4K | |
|---|---|---|---|
| the defaults (Plane, Point) | 1.08 ms | 1.54 ms | 3.67 ms |
| Bokeh Only, Blur Size at its top | 0.64 ms | 1.16 ms | 2.10 ms |
| Subject, Track, Blur Size at its top | 1.56 ms | 2.36 ms | 5.41 ms |
| Haze, flare, dirt, 400 orbs | 1.31 ms | 2.80 ms | 7.27 ms |
Haze and Subject cost more than Plane or Radial, because they work the depth out of the picture each frame. Nothing here has been timed on Windows, or on a smaller GPU than this one.
If it looks wrong
Nothing seems to change. Check Mix isn’t at 0 and Blur Size isn’t at 0. Look at Show Blur: if it’s all green, everything is in focus, so move the focus or change Depth From.
The wrong thing is sharp. Look at Show Depth. The estimate may simply be wrong for this picture: try another Depth From, or Depth Invert.
A halo of blur round the subject’s edges. Turn Depth Edges down for Subject or Haze, or use a real depth map packed Side by Side.
No bokeh discs, only blur. The clip has no highlights above Threshold. Lower it, or turn Highlights up.
The whole picture turns into discs. Threshold is too low. Raise it.
The tracker loses the subject. It follows sliding movement only, not turning or growing, so a subject that turns or comes towards the camera can lose it. Make Track Size about the subject’s size and press Grab again. A patch with little texture is hard to follow.
Half the picture, stretched across the frame. Depth From is Side by Side or Over Under, which expect a clip packed with its depth map. For an ordinary clip, use another source.
Onion Rings does nothing. The discs are too small to draw the rings. Turn Blur Size up.
Known limits
- The depth is a guess unless you supply one. Plane and Radial are exact for the scenes they describe; Luma, Haze and Subject are only as right as their assumptions about the picture. There’s no built-in depth-estimation model.
- Detail finer than about 4 pixels is softened in an estimated depth.
- The tracker follows sliding movement only, and has only been checked on synthetic pictures: nothing has checked it on a subject that turns, grows or is hidden.
- Side by Side and Over Under output the picture half, stretched to the frame, and at Mix 0 that stretched half is what comes through, not the packed clip.
- No presets. The recipes above are the nearest thing. No browser demo yet either.
- Never loaded into Resolume on macOS, and not compared against a real lens’s picture. On Windows it has only run on software rendering, against a still picture.
About
The last group, About, has the plugin’s name, version, licence and maker, and buttons that open this user guide, the project page, the source on GitHub and the support page in your browser.
Reporting something
If something’s wrong, shout at github.com/stoatworks-labs/hyacinth/issues. A screenshot, the controls you changed, and the composition’s resolution are usually enough. If the effect drew nothing, attach the log:
macOS    ~/Library/Logs/hyacinth/hyacinth.YYYY-MM-DD.log
Windows  %LOCALAPPDATA%\hyacinth\logs\hyacinth.YYYY-MM-DD.log