

Instant is instant film developing in front of you, for Resolume Arena and Avenue, as an FFGL effect. It does not fade a grade in. It runs the process of an integral instant print on the clip: a Take exposes the frame, and then the print develops in the open, stage by stage, in the order the chemistry sets. The dark green-grey start, the pale blue-cyan picture that warms as it arrives, the casts of cold and hot film, the dark corners of a short spread and the repeating mark of a dirty roller are what that process does.
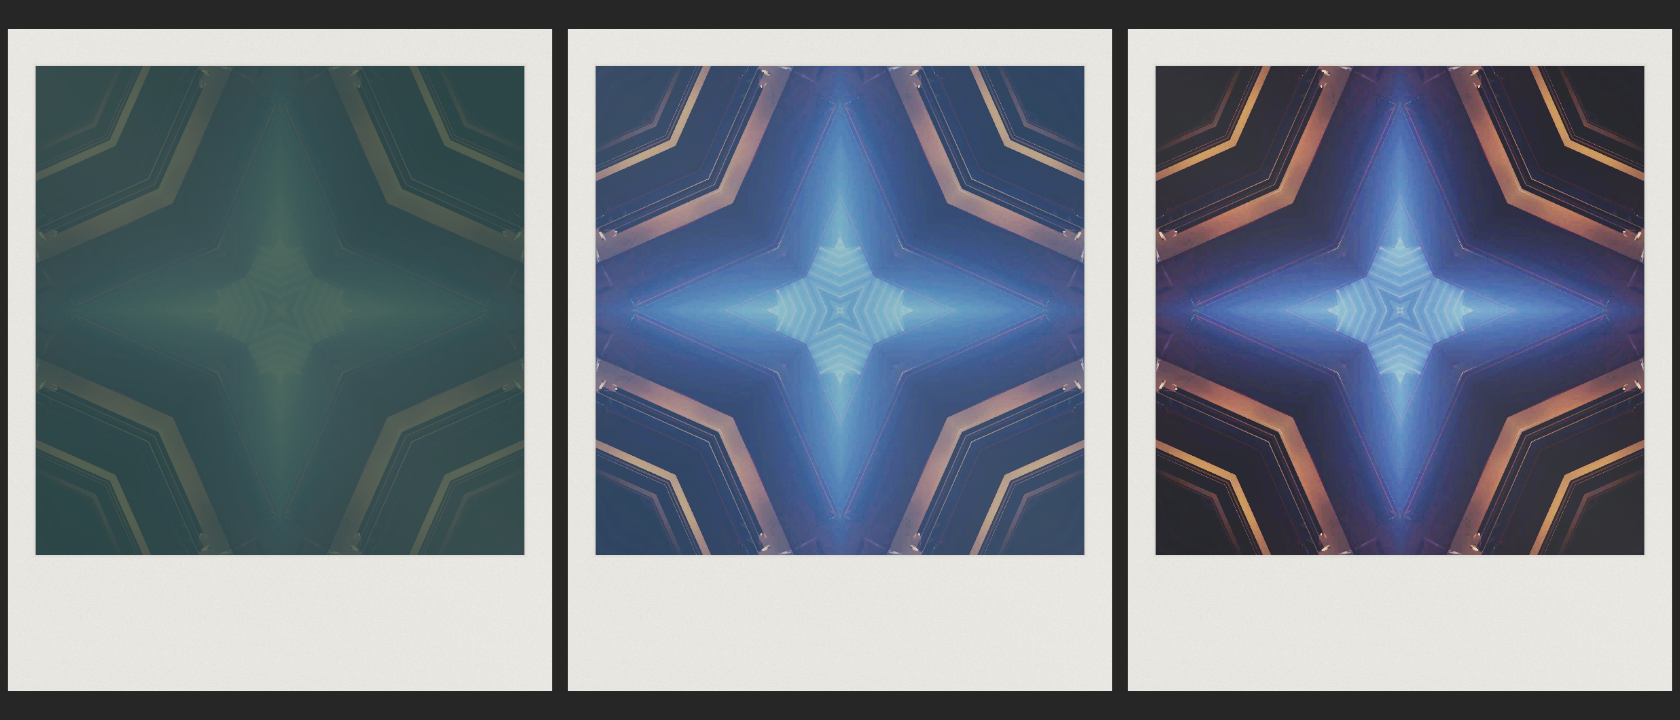
Resolume’s bundled demo clip IntoTheGlow through the plugin at the defaults, rendered by the offline harness rather than captured from Resolume: half a second, two seconds and eleven seconds after the take, at 64x.
Before you rely on this: released at v0.1.0, and honestly early. The process is measured rather than asserted, by a harness that drives the real plugin class and reads each claim back out of what it renders, at two rasters and on a software renderer: each dye layer’s density follows its first-order law with the stated time constant (70, 120 and 200 s for cyan, magenta and yellow, recovered to 1e-5); four minutes in, a neutral grey reads R 0.68 > G 0.61 > B 0.52, a blue-cyan print, and then moves only toward neutral, reaching it at the stop; the time constants at 14 and 34 °C stand in the Arrhenius ratio for every layer and for the timing layer; each row starts developing at its distance from the pod over the front’s speed; the dirty roller’s mark repeats at exactly its circumference; the print develops from the captured frame however the clip changes, and survives a resize; and the camera’s meter prints two exposures alike. Eight deliberately broken models are each shown to fail their check, and all 12 controls are shown to change the picture. The checks verify the stated model, not a real print: most of the chemistry’s numbers are assumptions, listed under Where the numbers come from. It has never been loaded into Resolume on macOS; there the one host it has run in is the fleet’s own test host,
oxbow, for 120 frames. On Windows it has: a build of this source loads, registers and renders in Resolume Arena 7.27.1 on software rendering (win-lab, Mesa llvmpipe, no GPU), with all 18 host controls matching what the plugin declares, in the fleet’s Arena gate (9 of 9 checks). The gate’s picture is a still: nine controls read as moving the picture (Temperature and Dirty Roller weakly), Speed inconclusive (it acts only while a print develops, and the gate’s print is finished 9.4 s after its take), and Mode and Interval were not measured, because they act only at the next take and the next print of a still is the same print. Software rendering says nothing about a GPU or about speed. Try it on a spare layer before you put it in a show.This codebase was created with AI assistance, directed and reviewed by a human author.
Installing
Every download carries one effect, SW Instant. Drop it into Resolume’s effects folder and restart Resolume:
macOS    ~/Documents/Resolume Arena/Extra Effects/
Windows  %USERPROFILE%\Documents\Resolume Arena\Extra Effects\
Avenue uses the same layout under its own folder name. The effect then appears in the effects browser as SW Instant.
The macOS download is a universal build (Apple silicon and Intel), as a .dmg or a .zip.
It is Developer ID-signed and notarised by the release pipeline after publication, so the bundle
simply loads; if macOS refuses a download, it predates the signing — download it again. The Windows download is an x64 installer or a .zip. It is not code-signed, so the
installer trips SmartScreen once: More info → Run anyway.
The process, not the look
An integral instant print, the kind an SX-70 or 600-type camera ejects, is exposed through its front. As the camera pushes it out, its rollers burst a pod of reagent in the print’s thick bottom border and spread it up the frame. Dye developers leave the negative’s three layers and migrate to the image layer, each at its own rate, held back wherever silver developed, so the print is a positive. A dark opacifier in the reagent shields the negative from light while this happens, and clears as a timing layer drops the pH, which also ends development.
Instant runs exactly that, on the host’s clock:
| stage | what you see |
|---|---|
| a Take captures the frame, and the camera’s meter sets the exposure | the print is of that moment, and keeps developing from it whatever the clip does next |
| a positive curve with instant film’s short latitude | soft highlights, dense shadows, about four stops from black to white |
| the reagent front leaving the pod edge | the print develops bottom-first (by a second at most: see Speed) |
| each dye layer first-order, cyan fastest, yellow slowest | pale and blue-cyan first, warming as the magenta and yellow arrive |
| the opacifier clearing | the dark green-grey the picture comes up through |
| the timing layer ending development, with a lower activation energy than the dyes | cold film stops short and pale; hot film finishes, warm |
| too little paste, or paste dried with age | dark corners, where the reagent never reached |
| dirt on a roller | a mark repeating at the roller’s circumference |
None of those is painted on. The colour drift, for one, is three time constants and nothing else: four minutes in at 24 °C a neutral grey reads density R 0.68, G 0.61, B 0.52, and it moves only toward neutral from then on.
Start here
- Put SW Instant on a layer with a clip. The defaults are Continuous mode, colour film at 24 °C, a new print every 16 seconds, at 64x.
- The first frame takes a print. It comes up out of a dark green-grey in a second or two, pale and blue-cyan, and warms; development ends 9.4 seconds after the take. The finished print then holds for about six seconds, and the next take starts a new one.
- Set Mode to Take and press Take when the clip shows something worth printing. Until the first press in Take mode, the plugin shows the clip untouched (a viewfinder).
- Lower Speed to watch a print come up slowly. 1x is real time: a real print takes about ten minutes to the stop, and is readable after two.
- Try Temperature at its ends before a take: cold film comes out pale and blue-cyan, hot film warm.
The print floats in its white frame, and outside it the output is transparent, so the layer below shows round it. Set Border to 0 to run the process full-frame.
Speed, and what “real time” means
A real integral print takes about ten minutes to the stop. Speed scales the film’s clock: 1x is real time, and it runs geometrically to 256x (64x by default). At 24 °C:
| Speed | picture readable | development stops |
|---|---|---|
| 1x (real time) | about 2 minutes | 10 minutes |
| 8x | about 15 s | 75 s |
| 64x (default) | 1 to 2 s | 9.4 s |
| 256x | about half a second | 2.3 s |
Cold film stops later, hot film sooner: see Temperature.
Speed acts on a print that is developing, so you can take at 1x and speed it up half way; it changes nothing once development has stopped. The film’s clock is the host’s: pausing the composition pauses the print, which a real print would not do.
The bottom-first development cannot be seen. The reagent front crosses the frame in one film-second, and the picture takes about a minute to come through the opacifier, so the bottom of a print leads the top by a level or two at most, less than the frame’s own shine. The harness measures the front row by row (to 5e-6 s); the eye cannot. The front’s effect you can see is at the far end of a short spread (Spread, below).
The Film group
Film picks the stock:
- Colour: three dye layers, cyan 70 s, magenta 120 s, yellow 200 s at 24 °C; a short latitude (four stops) and a maximum density of 1.65.
- Black & White: one image, 90 s, a longer latitude and a deeper black. Its channels are one.
- Vintage: slower dyes (90, 170, 230 s), a shorter latitude, a warm base stain and weaker cyan: an older, warmer, paler print.
Temperature, 4 to 36 °C, default 24. Every rate follows the Arrhenius law. The dyes’ activation energy (67.4 kJ/mol) is fitted to a published development chart; the timing layer’s is taken as half of it. So cold film slows the dyes more than it slows the stop: development ends before the slow yellow layer has arrived, and the print is pale, low in contrast and blue-cyan. Hot film finishes: every layer reaches its asymptote, a little warm. Cold also takes longer to stop: at 64x, about 25 s at 4 °C, 9.4 s at 24 °C and 5.5 s at 36 °C.
Measured through the plugin, a mid-grey patch printed at 256x, after the stop:
| R | G | B | |
|---|---|---|---|
| 6 °C | 119 | 128 | 139 |
| 14 °C | 117 | 120 | 125 |
| 24 °C | 117 | 117 | 116 |
| 34 °C | 117 | 116 | 112 |
The cold cast is strong; the hot cast is slight. The manufacturer describes the cold cast differently. Its support page on temperature says that below 13 °C prints come out over-exposed, lacking colour contrast and with a green tint, and that above 28 °C colour prints develop with a yellow/red tint. This model agrees on the light, flat cold print and on the warm hot one, but its cold cast is blue-cyan, not green: it comes from the yellow dye being the slowest and the one cut short, and a green tint would need the magenta to lag instead. The plugin was not changed to match, because that would reorder the development the rest of it is built on; it is recorded here instead.
Temperature is live for a developing print (a real print cares about the temperature it develops at, not the one it was exposed at), and changes nothing after the stop.
Expired (0 to 1): old film. The paste has dried, so it reaches less far up the frame (up to 30% less), the dyes lose density (cyan most, so an old print goes pink), and the base stains toward magenta and yellow.
The Exposure group
Take (a button). Exposes a print of the frame on screen now. In Continuous mode it also restarts the interval. The take is edge-triggered: one press, one print.
Mode: Take prints only when you press Take (and shows the clip untouched until the first press); Continuous takes a new print every Interval seconds, the first on the first frame. Switching modes keeps the print that exists.
Interval, 0.5 to 128 s, default 16: how often Continuous mode takes. At the default Speed a print is finished 9.4 s after its take, so 16 s leaves a finished print on screen for about six seconds. An interval shorter than the development time shows prints that never finish.
Exposure, ±2 stops, default 0. The camera meters. At every take an averaging meter reads the image window’s mean brightness and sets the exposure to bring it to photographic mid grey, within a range of −2 to +3 stops (a camera cannot lift a nearly black frame to grey). Exposure is the lighten/darken wheel on top of what the meter chose. So a dark clip and a bright one print at a similar brightness, as they would in a camera. The meter is an averaging one: a small bright subject on black is metered as a dark scene and prints light and washed out; turn Exposure down.
This meter was not in the plugin’s first design. Resolume’s demo clips are mostly CG on black, and at the clip’s own levels every print came out nearly black. A camera would have metered.
The Chemistry group
Spread: how the reagent spread.
- Full: it reaches the whole image, with room to spare.
- Short: too little paste. It falls short at the top, most at the top corners, which stay dark: there, the negative shows through, dark blue-black.
- Uneven: the paste ran in lanes, so the far edge is ragged.
Expired shortens any spread further.
Dirty Roller (0 to 1): dirt on one of the camera’s rollers. Every time it comes round it takes up to 60% of the dye in a band across the print, so the mark repeats down the print at the roller’s circumference (5/16 of the image height), and every repeat is the same mark, because it is the same dirt. It lightens.
Speed: see Speed, above.
The Print group
Border (0 to 1): at 1, the print in its frame, a square image window in a white plastic frame with the wide bottom border that held the pod, fitted to 92% of the raster. At 0, the image fills the frame and the process runs full-frame. In between, the frame grows in. Outside the print the output is transparent (colour and alpha both 0), so the print floats over the layer below.
Mix (0 to 1): fades back to the clip, and to the clip’s own alpha.
A Border change moves the image window under a print already developing. It is not a resize and restarts nothing.
Where the numbers come from
Said plainly, because most of them are choices.
| number | value | status |
|---|---|---|
| dye activation energy | 67.41 kJ/mol | fitted to 40 cells of ILFORD’s film development time/temperature compensation chart (2002), standard error 0.62 kJ/mol. That chart is for black-and-white silver development; using it for dye diffusion is an assumption. |
| timing layer’s activation energy | 33.7 kJ/mol | assumed: half the dye figure. No source. |
| dye time constants at 24 °C | 70, 120, 200 s | assumed: in the order the process is known for (blue-cyan first, warming), sized so the print is done in about ten minutes. |
| black and white; vintage | 90 s; 90, 170, 230 s | assumed |
| opacifier | 45 s | assumed: unreadable for about a minute, readable by two |
| the stop | 600 s | assumed: about ten minutes |
| reference temperature | 24 °C | a choice inside the manufacturer’s stated working range of 13 to 28 °C |
| front speed | one image height a second | assumed: a camera ejects a print in about a second |
| roller circumference | 5/16 of the image height | assumed |
| the curve, densities, colours of the opacifier, white and frame | chosen by eye; not measured | |
| meter | mid grey 0.18, −2 to +3 stops | the target is the photographic mid grey; the range is assumed |
The 13 to 28 °C range and the casts are from the manufacturer’s support page on temperature, read at release through the Internet Archive’s copies of February 2023 and April 2026 (the live page refuses scripted readers). No number in the plugin is taken from it, and on the cold cast it and the model disagree (see Temperature). The development time of about ten to fifteen minutes is the manufacturer’s figure as quoted by search results; it was not read at its source.
Nothing measures the casts that Temperature, Expired and Vintage produce against a real print: the harness measures the rates behind them, and the casts were judged by eye on Resolume’s demo clips.
How it works
- Capture (at a take). The host’s frame, sRGB-decoded and premultiplied by its alpha, into a half-float buffer.
- Meter (at a take). The capture’s luminance over the image window on a 64 × 64 grid, averaged to one value; the gain that brings it to mid grey, clamped, plus Exposure.
- Develop (every frame, every texel). Two doses per texel: the dye dose and the stop dose, each the film-seconds since the reagent reached that point, weighted by its Arrhenius rate. The dye dose stops growing once the stop dose reaches the stop.
- Print (to the host). Per layer, the density the exposure would reach, times (1 − e^(−dose/τ)); the opacifier, e^(−stop dose/τ); reflection off the reagent’s white pigment through both, or the negative where the reagent never reached; the frame, a little texture and shine; sRGB; Mix.
Resolume’s clock overflows a float, so all time is kept on the CPU in double, and the shaders see only the print’s age at the frame’s start and the frame’s length. A frame longer than a quarter of a second is clamped, so a stalled host does not jump a print to the end. The print survives a change of resolution: its buffers are resampled, not cleared.
Performance
Measured by the offline harness on an M4 Max at the defaults, best of three, glFinish both
sides, on a GPU shared with other work: 0.051 ms a frame at 1280 × 720, 0.071 at 1920 × 1080 and
0.37 at 3840 × 2160 (2.2% of a 60 fps frame), holding 21, 47 and 190 MB (the capture and two dose
buffers, 24 bytes a pixel). A take adds one capture pass and the meter. Nothing was timed inside
Resolume, and nothing was timed on Windows.
If it looks wrong
The picture is a dark green-grey. The print is still under the opacifier. At 64x it clears in about a second; at 1x it takes a minute or two.
The print is black. The frame was black when the print was taken. Many clips open on black, and the meter cannot lift black. In Continuous mode the next print comes an Interval later; in Take mode press Take again.
The print does not follow the clip. It should not: a print is of the moment it was taken. Use Continuous mode, or press Take.
The print never finishes. Interval is shorter than the development time at this Speed and Temperature. Raise Speed or Interval.
Everything outside the print is transparent. That is the frame floating over the layer below. Set Border to 0 for the process full-frame.
The top corners are dark. Spread is Short or Uneven, or Expired is up.
SW Instant is not in the effects browser. Check the folder under Installing, and that Resolume was restarted.
The effect does nothing at all. A shader that will not compile looks exactly like that, and the real message is in the log:
macOS    ~/Library/Logs/instant/instant.YYYY-MM-DD.log
Windows  %LOCALAPPDATA%\instant\logs\instant.YYYY-MM-DD.log
It records the GL vendor, renderer and version at load, which pass failed if one did, and the host’s clock and the unit the plugin decided it is in.
Known limits
- The chemistry’s numbers are mostly assumptions (see Where the numbers come from). One is fitted, to a chart for a different process.
- The cold cast disagrees with the manufacturer’s description: blue-cyan here, green there.
- Each dye absorbs only its own channel. Real dyes have unwanted absorptions and spectral curves; interimage effects are not modelled either.
- The spread is a straight front with a stated reach, not a fluid; the reagent trap at the top of the print, flash, double exposure and light fogging a print ejected into the sun are not modelled.
- Development ends sharply at the stop. A real print goes on changing slightly for hours.
- The controls stay live after a take. Film, Exposure, Expired, Spread and Dirty Roller change the print that is developing, where physically only Temperature could. A VJ tool whose sliders did nothing after a take would read as broken.
- Pausing the host pauses the print.
- No check measures the stop time directly, only what it causes.
- Never loaded into Resolume on macOS. Everything numeric was compiled, rendered and measured
offline against the real plugin class in a headless CGL context, plus an
oxbowload. - Never seen on camera footage, only on Resolume’s bundled CG loops.
- Checked at 320 × 180 and 1280 × 720 in the harness, and only timed at 4K.
- Only ever run on an Apple M4 Max, although the macOS build contains an Intel slice. On Windows, see the note at the top of this guide.
- No presets and no OpenFX version.
- There is a browser demo at instant-demo.stoatworks-labs.com. It is a port to a web page, not the plugin: the shaders run in WebGL2, and the clock, the take and the meter are rewritten in JavaScript. The page lists what it does not reproduce.
About
The last group, About, carries the plugin’s name, version, licence and maker, and buttons that open this user guide (stoatworks-labs.com/software/instant/guide/), the project page, the source on GitHub and the support page in your browser.
“Instant” describes the process. The plugin is not affiliated with, or endorsed by, any maker of instant film; product names above are used only to describe the kind of print it models.
Reporting something
github.com/stoatworks-labs/instant/issues. A screenshot, the Film, Exposure and Chemistry settings, and the composition’s resolution and frame rate are usually enough. If the effect did nothing, attach the log.