

Slitscan is slit-scan and strip photography for Resolume Arena and Avenue: one FFGL effect, SW Slitscan, that takes a picture of your clip lasting rather longer than an instant, four ways. Scan is the phone filter that stretches your face, which is strip photography with better marketing. Corridor is Douglas Trumbull’s Stargate from 2001. Tunnel is Bernard Lodge’s title tunnel for Doctor Who. Stretch is John Knoll’s warp stretch for Star Trek: The Next Generation. All four are made from whatever clip you put through it.
They share one trick. Leave the shutter open, let a slit decide which bit of the film can see out, and move something while it’s open: the slit, the camera or the artwork behind the slit. Each point of the film is exposed at a different moment of the move, so time turns into space and nobody has to warp anything. Trumbull built a machine to do it. The plugin does it once a frame, working out for every pixel when it was exposed and what it could see at that moment.
The idea came from ShiveringCactus’s video VFX History: Slit Scan, which covers both ways round. Nothing of it is used here but the idea.
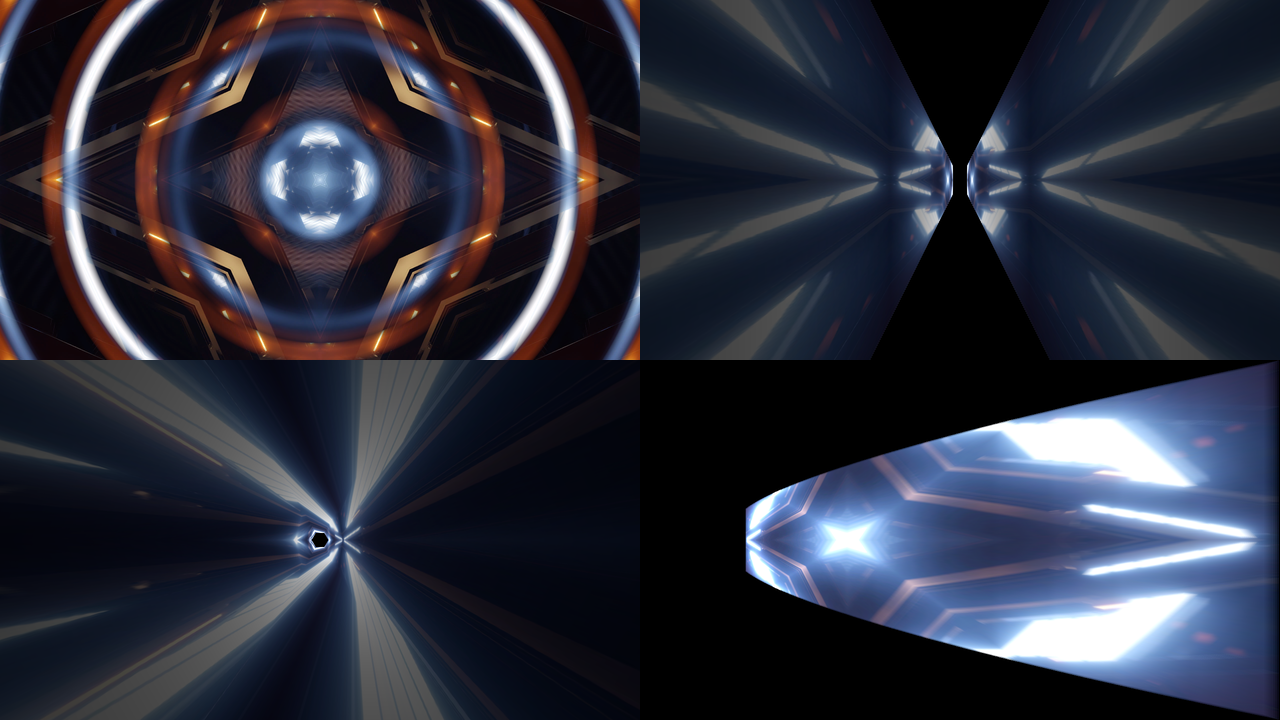
Rendered by sxtest, the offline harness, rather than captured from Resolume: Resolume’s bundled
IntoTheGlow_02 at 60 fps, each panel at 1280×720 and shown here at half size. Top left, Scan with
Direction Outward and Repeat Once, 4.67 s in: one whole four-second pass, held, so each ring is the
clip at a different moment. Top right, Corridor at its defaults, 1.65 s in. Bottom left, Tunnel
with Outline Hexagon, 1.65 s in. Bottom right, Stretch with the settings under Recipes,
1.65 s in.
Before you rely on this: it’s at v0.1.0, the first release, and very early days. Its behaviour is measured rather than asserted, by a harness (
sxtest) that drives the plugin’s own class in a headless GL context on one Apple Silicon Mac (macOS 26), at 1280×720 and 320×180 and again on Apple’s software renderer. A still picture comes through a whole pass of Scan bit for bit. After a knife-thin pass every pixel holds the frame the slit crossed it in: none of 921 600 wrong, in all six directions (on Clockwise and Outward, 225 and 108 pixels sit too near a frame boundary to call). A bar crossing under the slit leans 0.49 px a row where v/s says 0.5, and one moving with the slit at half its speed comes out the 160 rows that h·s/(s − v) says. Every Corridor, Tunnel and Stretch pixel shows the artwork from the moment the dolly’s own law says, within its derived bound (worst 0.77 of it). Fourteen models that are wrong on purpose and 27 one-character changes to the shipped code are all caught, and all 25 controls measurably change the picture. It’s never been loaded into Resolume on macOS. The one host it has run in on a Mac is the fleet’s own test host,oxbow, for 120 frames, so on a Mac nobody has seen its controls in Arena’s inspector, watched Scan Sync and Flow Sync follow Arena’s transport, or seen what Resolume’s own clips do to the frame rate at 4K. On Windows it has been in Resolume. The release build loads, registers asSW Slitscan(SX01, an effect) and renders in Resolume Arena 7.27.1 on software rendering (no GPU), with all its controls as declared and Arena’s log clean, and 17 of them measurably changed Arena’s picture of a still. Scan’s own controls, read straight off Arena, did what this guide says, and a still came through Scan to the pixel bar the slit’s line. Nobody has watched it follow Arena’s transport, and software rendering says nothing about speed. Try it on a spare layer before you put it in a show.This codebase was created with AI assistance, directed and reviewed by a human author.
Installing
Every download carries one effect, SW Slitscan (Slitscan.bundle on macOS, Slitscan.dll
on Windows). Drop it into Resolume’s effects folder and restart Resolume:
macOS    ~/Documents/Resolume Arena/Extra Effects/
Windows  %USERPROFILE%\Documents\Resolume Arena\Extra Effects\
Avenue uses the same layout under its own folder name. The effect then shows up in the effects browser as SW Slitscan.
The macOS download is a universal build (Apple silicon and Intel), as a .dmg or a .zip. It’s
Developer ID-signed and notarised, so the bundle just loads. The Windows download is an x64
installer or a .zip. The installer offers Arena’s folder above, or Avenue’s on a machine that
only has Avenue; change it on the folder page if you use the other one. The 0.1.0 installer
offered C:\Program Files\Slitscan instead, which Resolume never looks at, so give that one the
folder above. It isn’t code-signed, so it trips SmartScreen once: More info → Run anyway.
Or skip the installer, take Slitscan.dll out of the .zip and drop it into the folder by hand.
Start here
Put SW Slitscan on a layer with something in it and leave every control where it is. The defaults are a Stargate: Corridor, two walls of light running in to a vanishing point in the middle of the frame, made from your clip sliding past a slit while a camera dollies in from sixty times its closest distance. The far end glows, and the walls stream towards you at a quarter of the clip’s width a second.
Then, in this order:
- Flow to the middle of its slider: the walls stop. Past the middle they stream towards you faster; below it they go the other way.
- Dolly to Even Exposure. Every depth now gets the same light, and the clip spreads evenly down the walls instead of crowding in at the far end.
- Walls to Four for walls, floor and ceiling. Roll turns the whole corridor.
- Mode to Tunnel, and try each Outline. The slit is now a circle, a square, a diamond or a hexagon, and so is every ring of the tunnel.
- Mode to Stretch. On the defaults it’s a dim wedge, which is what the physics gives you. Set Dolly to Even Exposure, Depth to 0.28, Exposure to 0.7 and Centre X to 0.2 for the warp.
- Mode to Scan. A thin white line comes down the frame every four seconds, and behind it the picture is whatever the slit saw on its way past. Anything still stays as it was; anything moving leans, stretches or squashes. Put it on a live camera and move.
- Repeat to Once and press Restart: one pass, then it holds the result. Direction on Outward or Clockwise turns a pass into rings or a sweep, as in the top left of the picture at the top.
One long exposure
A slit-scan picture is one long exposure, taken while something moves. The shutter stays open and a slit decides which bit of the film can see out. Each point of the film is only exposed while the slit lies over it, so each point records a different moment of the move. There are two ways round, and the plugin does both:
- The slit at the film. The scene stays put and a slit sweeps across the film in front of it, so each line of the picture is a different instant. That’s strip photography, the focal-plane shutter, the rolling shutter and the phone filter. It’s Scan.
- The slit at the subject. A slit sits in front of backlit artwork, and a camera dollies towards it with the shutter open while the artwork slides along behind it. As the camera closes in, the slit’s image sweeps outwards across the film, so each point of the picture was exposed with the camera at a different distance. The artwork lands on the walls of a corridor in perfect perspective, because perspective is what a camera at that distance does. That’s Corridor, Tunnel and Stretch.
| what you see | why | mode |
|---|---|---|
| a still clip comes through unchanged | nothing moved, so the slit had nothing new to record | Scan |
| things moving across the slit’s path lean | each row was taken a moment after the last, and they’d moved on | Scan |
| things moving with the slit stretch, and against it shrink | the slit takes longer to cross something going its way, and less time to cross something coming at it | Scan |
| walls in perfect perspective | the slit’s image moves outwards as the camera closes in, which is all perspective is | Corridor, Tunnel |
| the far end glows | on Constant Speed the slit’s image crawls while the camera is far away, so the far end gets the most light | Corridor, Tunnel |
| the walls stream past | Flow moves where the artwork starts from one frame to the next | Corridor, Tunnel |
| the warp: small at the vanishing point, huge at the edge | the clip is lit a strip at a time as the camera closes in, so what’s lit late is drawn large and what was lit early sits small | Stretch |
The two halves work differently inside. Scan keeps a film between frames, because a pass can take half a minute and the slit has to remember what it saw on the way. Corridor, Tunnel and Stretch keep nothing between frames but where the artwork starts. Each frame is one whole exposure, the camera’s entire run in from its farthest to its closest, worked out pixel by pixel.
All of it happens in linear light, since exposure is light adding up: the clip is turned from sRGB into light, exposed, and turned back.
The Camera group
Every slider in the inspector runs from 0 to 1. The ranges in this guide are what those positions mean, and for the sliders that aren’t linear, where the middle is.
- Mode: Scan, Corridor (the default), Tunnel or Stretch.
Scan. A slit sweeps the frame once a pass: down, up, across, round like a clock’s hand or out from the centre in a ring, every Scan Time or in step with Resolume’s beat. Behind it is whatever the slit saw on its way past; ahead of it is the live clip, the last pass or black. The Scan group is all about this mode.
Corridor (Trumbull). One, two or four straight slits, a camera dollying from Depth times its closest distance down to its closest, and the clip sliding past behind the slits as it goes. Each wall is the clip seen through a slit as it slides by: every column of the clip that crosses the slit lands at its own depth, and the clip’s height is spread up the slit, so the clip’s rows run to the vanishing point. Nothing was drawn to make them do that.
Tunnel (Lodge). The slit is an outline instead of a pair of lines: a circle, square, diamond or hexagon. Every ring of the tunnel is the outline’s shape. The outline sits on the clip round its middle, its flat sides 0.4 of the clip’s height out (a circle’s radius), with the clip sliding past behind it, and each point of the tunnel sees whatever is behind the outline’s point in its direction. Lines in the clip that run the way it slides shear into diagonals down the tunnel walls.
Stretch (Knoll). Here the clip is the subject rather than the backing: a card that fills the frame at the camera’s closest. A strip of light sweeps across it while the camera dollies in, so whatever is lit late is drawn large and whatever was lit early sits small, out towards the vanishing point. A wide strip smears each column out along its ray. The defaults are set up for the corridor, and on them Stretch is a dim wedge: a strip sweeping a card sixty times further away than its closest lights most of it while it’s tiny. The warp needs the settings in Recipes.
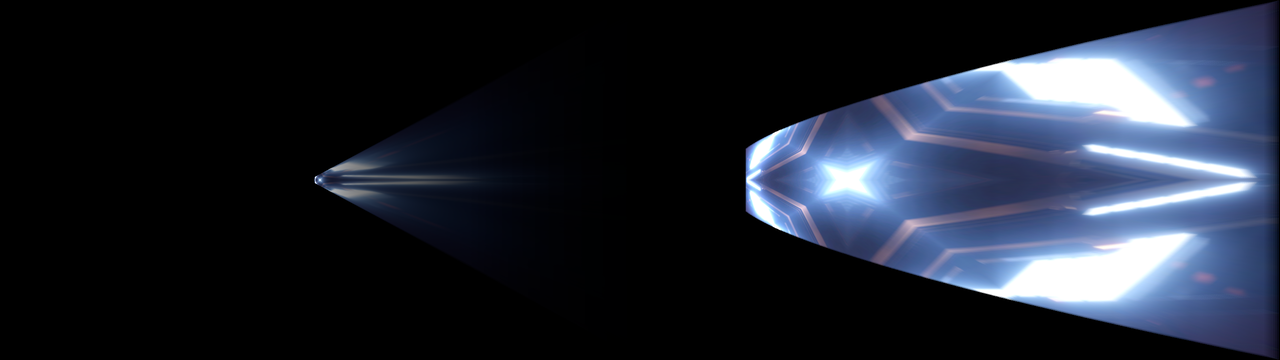
Resolume’s IntoTheGlow_02 through Stretch, 1.65 s in, rendered by the harness at 1280×720 (shown at half size). Left, every other control at its default. Right, the recipe: Dolly Even Exposure, Depth 0.28, Exposure 0.7 and Centre X 0.2.
What works where
| control | Scan | Corridor | Tunnel | Stretch |
|---|---|---|---|---|
| the Scan group | yes | nothing | nothing | nothing |
| Walls, Slit Height | nothing | yes | nothing | nothing |
| Outline | nothing | nothing | yes | nothing |
| Gap | nothing | yes | yes | nothing |
| Slit Width | the slit, a share of the pass | the slit, a share of its distance off the axis | as Corridor | the strip of light, a share of the clip |
| Depth, Dolly, Exposure, Roll | nothing | yes | yes | yes |
| Centre X, Centre Y | the centre of a Clockwise or Outward scan | the vanishing point | the vanishing point | the vanishing point |
| the Artwork group | nothing | yes | yes | nothing |
| Mix | yes | yes | yes | yes |
Stretch’s clip is the subject, so the Artwork group has nothing to move. The artwork keeps flowing in every mode, though, Scan included, so switching back to Corridor finds it where it would have been.
The Scan group
Only Scan reads this group. It also reads Slit Width (the slit’s width, as a share of the pass) and, for a Clockwise or Outward scan, Centre X and Centre Y, all in the Slit group.
What moving things do. A still picture comes through a pass unchanged, bar the slit’s own line: nothing moved, so there was nothing different to record. Anything that moves gets drawn at more than one moment. Moving across the slit’s path, it leans: v/s pixels a row, for something moving at v under a slit moving at s. Moving the same way as the slit, it comes out taller, h·s/(s − v) for something h tall, and moving against it, shorter. That’s why the phone filter makes chins three feet long: a face drifting down with a downward slit stays under it for ages.
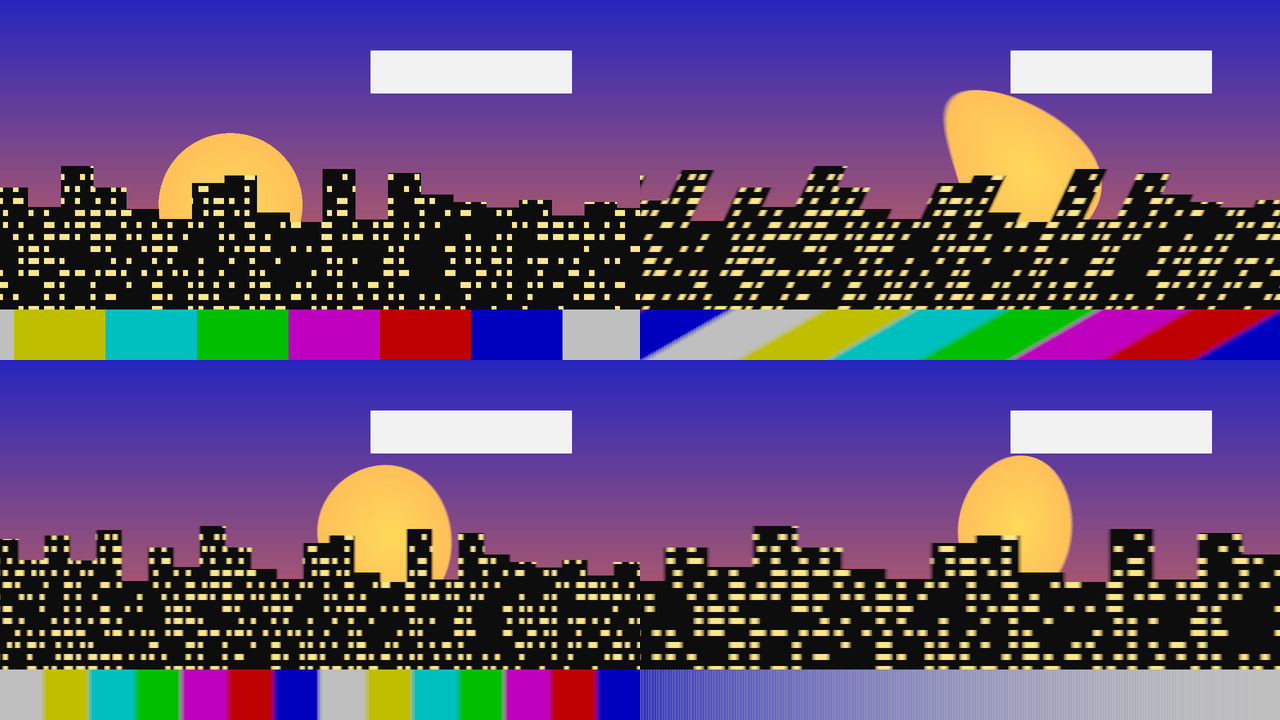
sxtest’s own moving test card through the plugin, rendered by the harness at 1280×720 (shown at
half size), 270 frames (4.5 s) in. The skyline scrolls left at 86 pixels a second and the colour
bars at 320, and the sun drifts. Top left, the card as it is (Scan with Mix 0). The rest are Scan
with Repeat Once and the default Scan Time, so one whole 4-second pass, held. Top right, Down: the
slit comes down at 184 rows a second, so the skyline leans about half a pixel a row. Bottom left,
Right, against the scroll: everything is narrower, and the colour bars, coming the other way at
nearly the slit’s speed, are half as wide. Bottom right, Left, with the scroll: the buildings are
wider, and the bars, going the same way at very nearly the slit’s speed, come out as one long
smear, because the slit spent the whole pass riding the edge between the grey bar and the blue
one.
- Direction: Down (the default), Up, Right, Left, Clockwise (a hand sweeping round from twelve o’clock) or Outward (a ring growing from the centre to the farthest corner). Clockwise and Outward go round Centre X and Centre Y.
- Scan Time: how long one pass takes, 0.25 to 30 seconds (default 4; the middle of the slider is about 2.7). Only used with Scan Sync on Free.
- Scan Sync: Free (the default: a pass every Scan Time), Beat, Bar, 2 Bars or 4 Bars: a pass lasts that long at Resolume’s tempo and starts on a beat or a bar line. See Time and tempo.
- Ahead: what you see where the slit hasn’t been yet this pass: Live (the default: the clip as it is now), Last Pass (what the previous pass left there) or Black.
- Repeat: Loop (the default: pass after pass) or Once (one pass, then it holds the picture).
- Restart: starts a pass from the starting edge. With Scan Sync on Free that’s now. With Scan Sync on anything else it depends on Repeat: on Once the new pass waits for the next boundary (the next beat, bar, two bars or four), and on Loop Restart does nothing, because the passes belong to the tempo. Whatever the old pass hadn’t reached keeps what it had.
- Slit Line: how bright the line marking the slit is drawn, 0 to 1 (default 0.6). It’s a thin white line; 0 hides it. It also goes once a Once pass has finished.
And from the Slit group:
- Slit Width: the slit’s width as a share of the pass, 0 to 0.3 (default 0.02; the slider is steeper towards the top, and its middle is 0.075). At 0 the slit is knife-thin and each pixel holds the one frame the slit crossed it in. Wider, each pixel is the average of every frame it was under the slit for, in linear light, as film would be: smoother, softer, and ghostly on anything fast. At the defaults a pixel is under the slit for about 0.08 seconds.
- Centre X, Centre Y: the middle of a Clockwise or Outward scan. Centre X runs across the frame from the left and Centre Y up it from the bottom; both are 0.5, the middle, by default.
The film. The first frame primes the film as if a whole pass of it had already been taken, so a pass picked up halfway through a bar, or Ahead on Last Pass, shows the clip rather than black. Changing the composition’s resolution mid-pass keeps the film, and the slit carries on over the same picture.
The Slit group
This is the slit-scan rig, the slit at the subject: Corridor, Tunnel and Stretch read it. Scan reads only Slit Width, Centre X and Centre Y from here.
Distances on the picture are measured from the vanishing point in half the frame’s height: the top edge of the frame is 1 away, the side edges of a 16:9 frame 1.78, and its corners 2.04.
-
Walls (Corridor): Two (the default: a slit either side, the Stargate), One (the right-hand wall, before any Roll) or Four (walls, floor and ceiling). With Four, the side walls and the floor and ceiling are each exposed in full, so where they overlap they get both exposures and come out brighter: along the diagonals, at the default Slit Height. At Slit Height 1 (0.4 on the slider) they meet edge to edge instead.
-
Outline (Tunnel): Circle (the default), Square, Diamond or Hexagon. The slit’s shape, and so the shape of the hole and of every ring of the tunnel.
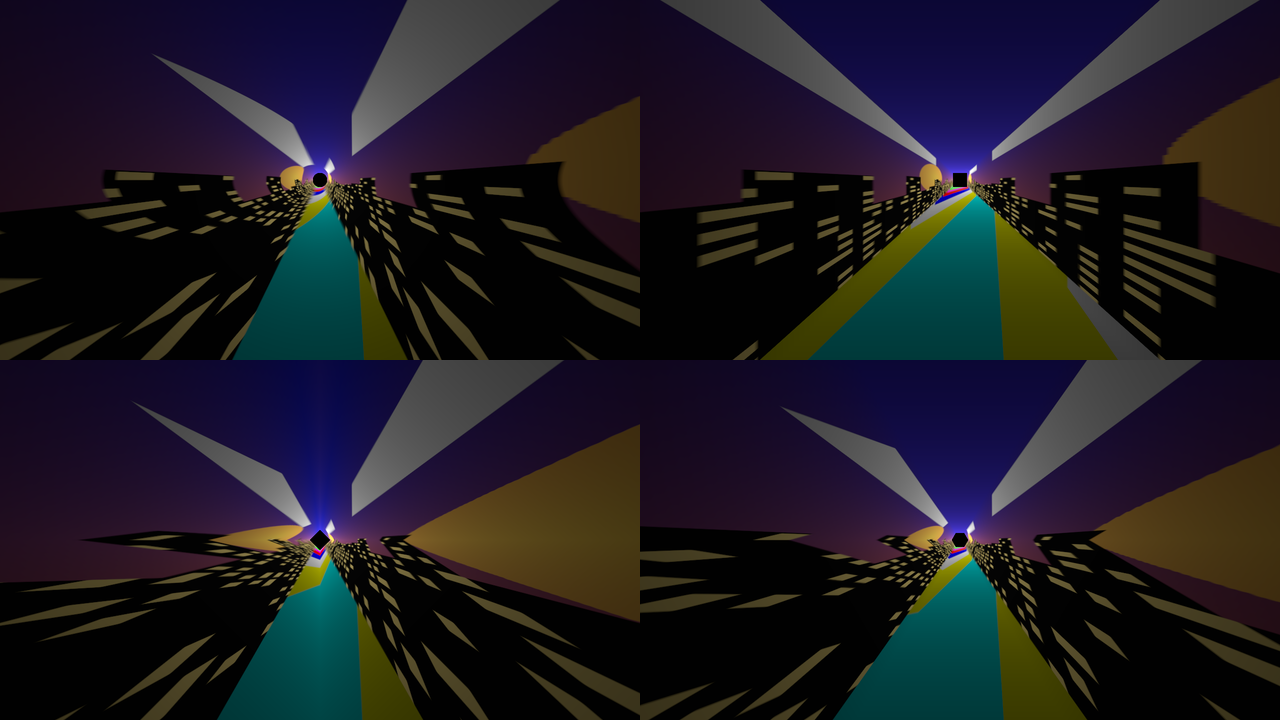
sxtest’s moving test card through Tunnel, 99 frames (1.65 s) in, rendered by the harness at 1280×720 (shown at half size), with every other control at its default. Top left Circle, top right Square, bottom left Diamond, bottom right Hexagon. The hole takes the outline’s shape, and so do the walls: on Square the skyline stands up straight on the side walls and the colour bars lie flat along the floor. -
Gap: where the slit is, which is the size of the unexposed hole round the vanishing point: 0.005 to 0.5 (default 0.04; the middle of the slider is 0.05). The slit’s image starts at Gap, with the camera at its farthest, and ends at Gap × Depth, with the camera at its closest, so Gap zooms the whole corridor or tunnel about the vanishing point.
-
Slit Height (Corridor): how tall the slit is against how far it is off the axis, which is how steeply the walls’ top and bottom edges run in to the vanishing point: 0.25 to 8 (default 2; the middle of the slider is 1.4, and 1 is at 0.4). The clip’s whole height is spread up the slit, so a taller slit also stretches the clip taller on the walls.
-
Slit Width: how wide the slit is against how far it is off the axis, 0 to 0.3 (default 0.02, a slit a fiftieth as wide as it is far off; the middle of the slider is 0.075). 0 is knife-thin. A wider slit sees more of the clip go past, so each point is the clip averaged over its stretch of the slide: softer, and blurred along the depth. In Stretch it’s the strip of light, as a share of the clip.
-
Depth: the camera’s farthest distance over its closest, 1.5 to 200 (default 60; the middle of the slider is about 17). The walls reach out from Gap to Gap × Depth, which at the defaults is 2.4, past the corners of the frame. With the default Gap, a Depth below about 45 leaves black at the sides of a 16:9 frame.
-
Dolly: how the camera closes in.
- Constant Speed (the default): at a steady speed. The slit’s image crawls while the camera is far away and races once it’s close, so the far end gets the most light, as Trumbull’s did: nearly twice the clip’s own brightness at the default Depth. The walls darken towards the frame’s edges. The camera also spends most of the move far away, so most of the clip’s slide is crammed in close to the vanishing point.
- Even Exposure: closing in by the same fraction of the distance in each moment. Every depth gets the same light, the clip’s own brightness, and the slide is spread evenly down the walls.
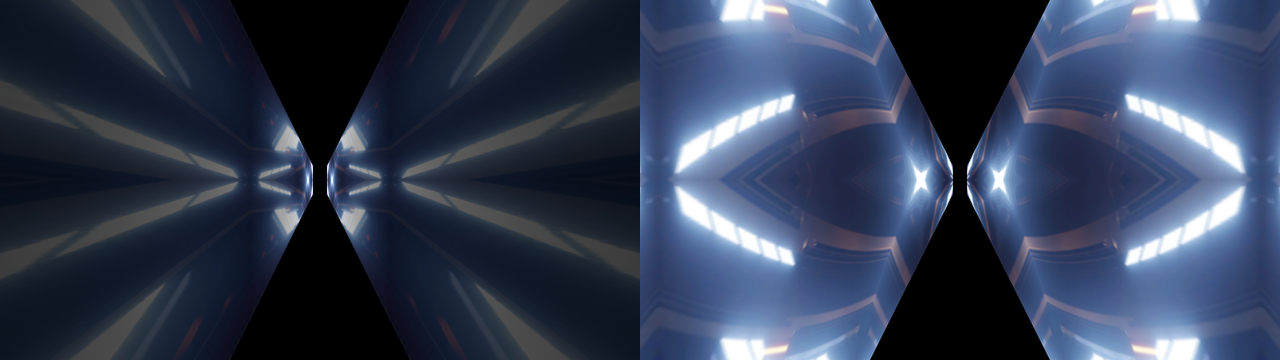
Resolume’s IntoTheGlow_02 through Corridor at its defaults, 1.65 s in, rendered by the harness at 1280×720 (shown at half size). Left, Dolly on Constant Speed (the default); right, Even Exposure. Nothing else differs.
-
Exposure: more or less light, −4 to +4 stops (default 0, the middle of the slider; each eighth of the slider is a stop). In Corridor and Tunnel, at 0 the clip shows at its own brightness half way through a constant-speed move, or everywhere on Even Exposure. Light that adds up past white stays white.
-
Roll: turns the whole rig, clip and all, 0 to 360° (default 0). At 90° Corridor’s two walls become a floor and a ceiling. In Stretch it’s the way the strip of light sweeps; at 0 it sweeps from left to right, so the right of the clip is drawn largest.
-
Centre X, Centre Y: the vanishing point (or the centre of a Clockwise or Outward scan). Centre X runs across the frame from the left and Centre Y up it from the bottom; both are 0.5, the middle, by default. Move it off the middle and the walls still reach the nearer edges of the frame, but may stop short of the farther ones, at Gap × Depth.
The Artwork group
What’s behind the slit, and how it moves: Corridor and Tunnel read this group.
- Travel: how far the clip slides past the slit during one exposure, 0.05 to 8 widths of the clip (default 1; the middle of the slider is about 0.63). Each depth sees the clip at a different point of its slide, so more Travel lays more of the clip down the length of the walls; past one width it’s laid down more than once. Wherever the slide carries the slit past the clip’s edge, Wrap decides what it sees there.
- Art Angle: which way the clip slides, 0 to 360° (default 0, sideways along the clip).
- Flow: moves where the clip starts its slide from one frame to the next, so the walls stream past: −2 to +2 widths of the clip a second, or a beat, or a bar (default +0.25 a second). The middle of the slider is 0, which stands the corridor still, and it’s steeper towards its ends: 0.75 is +0.5 and the top is +2. Positive brings the clip towards the camera, so the walls stream out towards you; negative sends them away.
- Flow Sync: what Flow is measured in: Free (the default: widths a second), Beat or Bar (widths a beat or a bar at Resolume’s tempo, four beats to the bar).
- Wrap: what lies beyond the clip’s edges once the slide takes the slit past them: Mirror (the default: the clip, then its mirror image, so there’s no seam) or Repeat (the clip again and again, with a seam wherever its opposite edges don’t match).
The Output group
- Mix: the result over the clip, 0 to 1 (default 1). At 0 the clip goes through untouched.
Corridor, Tunnel and Stretch make the layer opaque as Mix goes up: anything the rig didn’t expose is black, not see-through. Scan keeps the clip’s own transparency, and Ahead’s Black is opaque black.
Recipes
The Stargate. The defaults. Walls on Four for a corridor all round, Flow at 0.75 (half a clip width a second) to fly faster, and Flow Sync on Beat to tie the speed to the tempo.
The phone filter. Mode Scan, everything else at its defaults, on a live camera. Move sideways to lean, move down with the slit to grow and up against it to shrink. Repeat Once and Restart for one take at a time.
Knoll’s warp. Mode Stretch, Dolly Even Exposure, Depth 0.28 (about 6), Exposure 0.7 (+1.6 stops) and Centre X 0.2. Roll turns the way it streams, and a wider Slit Width smears it further.
Lodge’s tunnel. Mode Tunnel, Outline to taste, Flow at 0.75 so it streams faster. Travel up lays more of the clip down the tunnel, and Art Angle changes which of the clip’s lines shear into diagonals. On the defaults, a busy clip turns into streaks and the outline mostly shows in the hole in the middle. For rings you can see the shape of, set Dolly to Even Exposure, Gap to 0.69 (0.12) and Travel to 0.86 (four widths).
A strip photograph of the clip. Mode Scan, Repeat Once, Direction Down or Outward. One pass, then it holds: every row (or ring) is the clip at a different moment, as in the top left of the picture at the top. Restart takes another.
A frame that rewrites itself every bar. Mode Scan, Scan Sync Bar, Ahead Last Pass. Once a bar, the slit wipes a fresh take over the last one, and there’s never any live clip on screen.
Drawn in from black. Mode Scan, Ahead Black, Repeat Once, Scan Sync Bar. Press Restart and on the next bar the picture draws itself in behind the slit, then holds.
Walls that meet. Walls Four and Slit Height 0.4 (1): walls, floor and ceiling meet edge to edge along the diagonals instead of overlapping.
Time and tempo
This is what the code does and what the harness checks; Arena has only been seen running it as far as the Before you rely on this box says.
A free scan and the flow move on by the host’s time since the last frame. A stall or a jump forward moves them on by a quarter of a second at most, and a step backwards passes no time. For the first few frames after it loads, while it works out whether the host counts in seconds or milliseconds (Resolume has been seen sending both), the plugin runs on a steady clock of its own. Resolume’s clock has also been seen half a billion milliseconds into a session, where a single-precision float can’t tell one frame from the next, so the plugin keeps its time in double precision. A take rendered with the host’s clock 499 217 238 ms in matches one from 0: bit for bit in Scan, and within a hundred-thousandth in Corridor.
The scan only runs while Mode is on Scan. Switch to another mode and back, and it carries on from where it was. The film waits too.
Scan Sync counts Resolume’s bars from its bar phase coming round, four beats to a bar. Beat is a pass every quarter of a bar and Bar one a bar. 2 Bars and 4 Bars count bars from the one the scan started in, and only while Mode is on Scan, so two layers can be a bar or more apart on those. A synced pass picked up mid-bar starts where the bar is, with the clip already behind the slit (the primed film). If the bar phase jumps back, the scan starts a new pass from wherever the bar now is; if it stops moving, so does a synced scan. Until it has seen the bar phase move at all, the plugin counts bars on its own clock at Resolume’s tempo (120 BPM if none has arrived).
Restart against the tempo: on Free it starts a pass now. Synced and on Once, it waits for the next boundary, then runs one pass. Synced and on Loop, it does nothing.
Flow Sync is a speed, not a position. Beat and Bar scale Flow by Resolume’s tempo, so the walls stream twice as fast at twice the BPM, but nothing lines the clip up with the downbeat. Flow runs in every mode, so a corridor comes back where it would have been.
Performance
Measured by the offline harness on an Apple Silicon Mac: GPU time by GL_TIME_ELAPSED, median of
120 frames after a warm-up, on a GPU shared with other work, so the small numbers wobble from run
to run.
| 720p | 1080p | 4K | |
|---|---|---|---|
| the defaults (Corridor, two walls, Slit Width 0.02) | 0.06 ms | 0.28 ms | 1.19 ms |
| the heaviest case tried: Corridor, four walls, Slit Width 0.3 | 0.27 ms | 0.76 ms | 3.53 ms |
Tunnel and Stretch with a wide slit come between, up to 2.1 ms at 4K, and Scan is the cheapest, 0.91 ms at 4K. The heaviest case at 4K is about a fifth of a 60 fps frame. What costs is a wide slit, since each pixel then takes up to 24 looks at the clip along its exposure, and Four walls, which does the work twice over for every pixel. These are macOS figures from the harness; nothing was timed inside Resolume.
If it looks wrong
The effect does nothing at all. That’s what a shader that won’t compile looks like. The actual error is in the log:
macOS    ~/Library/Logs/slitscan/slitscan.YYYY-MM-DD.log
Windows  %LOCALAPPDATA%\slitscan\logs\slitscan.YYYY-MM-DD.log
It records the build, the GL vendor, renderer and version at load, which shader failed if one did, and what unit the host’s clock arrives in.
It isn’t in the effects browser. Check that Slitscan.dll is in the folder under Installing
(the 0.1.0 Windows installer offered Program Files, which Resolume never reads), and that Resolume
was restarted.
Scan changes nothing. Nothing in the clip is moving. A still picture comes through a pass unchanged, bar the slit’s own line, because there’s nothing different for the slit to record.
A control does nothing. Not every control acts in every mode: see What works where. Scan Time does nothing with Scan Sync on anything but Free, and Wrap only shows once the slide takes the slit past the clip’s edge.
Restart does nothing. Scan Sync is on and Repeat is on Loop, so the passes belong to the tempo. On Once it waits for the next boundary.
The slit’s line has gone. Slit Line is at 0, or Repeat is on Once and the pass has finished.
Black round the edges of the corridor or tunnel. The walls stop at Gap × Depth from the vanishing point. Raise Depth or Gap, or bring Centre X and Y back towards the middle.
A black hole in the middle. That’s Gap: the part of the film the slit’s image never reached. Turn it down for a smaller hole.
The corridor is dim except near the middle. That’s Constant Speed: the light is set so the clip shows at its own brightness half way through the move, and once the camera is close the slit’s image races across the outer walls, so they get less light the further out they are. Raise Exposure, or try Even Exposure.
Stretch is a dim wedge. It is, on the defaults. The warp’s settings are under Recipes.
Blown out to white. Too much Exposure. On Constant Speed the far end already gets nearly twice the clip’s own light, so it goes first.
Steps or ghosts along a moving edge in Scan. A clip is a run of separate moments (most of Resolume’s own clips have 30 a second), and the slit records each one as a band as wide as the slit travelled while it was on screen, so a fast edge comes out in steps. More Slit Width blends neighbouring bands into each other, which on something fast looks ghostly instead. A longer Scan Time makes the bands narrower.
A seam down the walls. Wrap is on Repeat and the clip’s opposite edges don’t match. Mirror has no seam.
The layer under it has gone. Corridor, Tunnel and Stretch make the layer opaque (see The Output group). Use a blend mode that ignores black.
Known limits
- Never loaded into Resolume on macOS. How the 25 controls in five groups read in Arena’s inspector on a Mac is untested, and so is how Scan Sync and Flow Sync follow Arena’s transport.
- The inspector shows slider positions, not seconds, stops or clip widths. This guide gives the ranges, and where the middle of each slider is.
- A perfectly sharp slit on a flat, backlit card. No lens blur, no depth of field, no light falling off away from the axis, no flare. The real rigs were close to this, and the plugin is exact to it.
- sRGB in, sRGB out. The plugin takes what Resolume hands it as sRGB-encoded and turns it into light. A host handing over linear light would have it lit twice over.
- A very wide slit with a lot of Travel is sampled at up to 24 points along each exposure, so it can come out stepped along the depth rather than smoothly blurred.
- Stretch’s card fills the frame at the camera’s closest, and anything off it is black. With a wide strip the last few pixels at the far edge fade to black: by the time the camera is close enough for them to see the card, the strip has gone past.
- One set of defaults. A host’s parameters have one default each, so Stretch starts from the corridor’s, which is why it starts as a dim wedge.
- Bars are four beats. Scan Sync’s Beat is a quarter of a bar and Flow Sync’s Bar is four beats, whatever the music is doing.
- Not built: Dykstra’s pinholes and the rainbow warp stars (Slipstream does those), a twisting outline, and a slit whose shape comes from the clip.
- No presets (Resolume saves parameter presets itself) and no OpenFX version. There is a browser demo to try it before installing: the plugin’s own shaders with every control, but a browser, not Resolume, and it says what it leaves out.
About
The last group, About, has the plugin’s name, version, licence and maker, and buttons that open this user guide, the project page, the source on GitHub and the support page in your browser.
Reporting something
If something’s wrong, shout at github.com/stoatworks-labs/slitscan/issues. A screenshot, the Mode and any controls you changed, Scan Sync and Flow Sync if you’re using them, and the composition’s resolution and frame rate are usually enough. If the effect drew nothing, attach the log.
The idea is ShiveringCactus’s, from VFX History: Slit Scan; the code and the look are new. The FFGL SDK and GLEW it’s built on are credited in ATTRIBUTIONS.md, which travels with the plugin.