

Stencil is spray paint through a cut stencil, for Resolume Arena and Avenue, as an FFGL effect. It is not a posterise filter with a spray texture laid over it. The plugin cuts the clip into a real stencil, one sheet per layer, and a stencil cannot hold a floating piece: cut out an O and its middle falls out. So every island gets a bridge, the shortest strip of sheet there is from it to any other piece, and it goes round again until nothing floats. Then the paint is sprayed through the holes from a nozzle at a distance. The look falls out of that: the gap in the O where its ring is thinnest, islands inside islands all hung off the frame, layers sprayed dark over light, a halo in proportion to the nozzle’s distance, ghostly bridges where the sheet lifts, and drips.
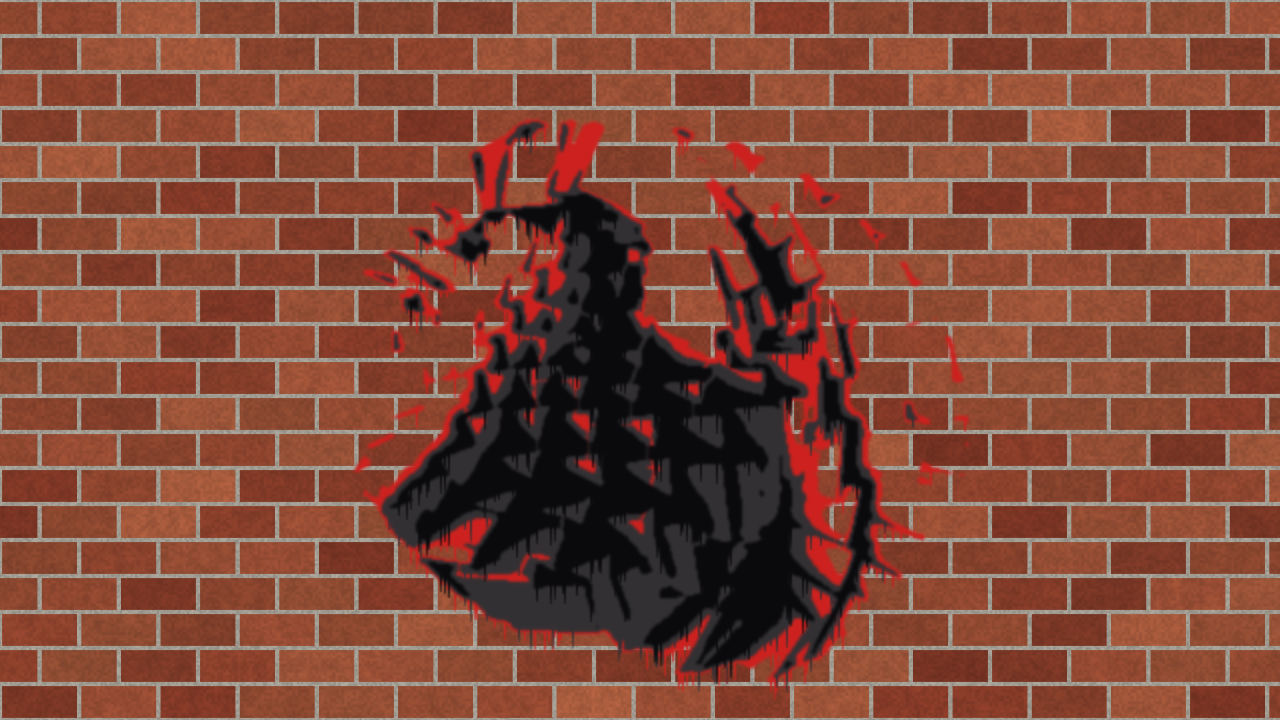
Resolume’s bundled demo clip Metalive 01 through the plugin with three layers of the Street cans on the Brick wall, rendered by the offline harness rather than captured from Resolume.
Before you rely on this: released at v0.1.0, and honestly early. The stencil is measured rather than asserted, by a harness that drives the real plugin class headlessly and reads every property back out of the picture it renders, at two rasters and on a software renderer: after bridging, a flood fill of the output finds no piece of sheet cut off from the frame, on letters, rings nested four deep, squares in squares and random blobs; every bridge is exactly the shortest gap from its island to another piece, against brute force; a bridge is exactly the stated width and stays 4-connected; the paint across a straight edge is the chord fraction of the nozzle’s disc to within one half-float step; n layers give n + 1 tones, darkest on top; a picture panned by whole cells gets the same bridges moved with it; and a resize keeps last frame’s bridges. Nine deliberately broken models are each shown to fail their check, and all 14 controls are shown to change the picture. It is heavy for a VJ effect (see Performance). It has never been loaded into Resolume on macOS — the one host it has run in there is the fleet’s own test host,
oxbow, for 120 frames. On Windows it has: the DLL release.yml built from this source loads in Resolume Arena 7.27.1 on software rendering (win-lab, Mesa llvmpipe, no GPU), registers asSW Stencil/SN01/ effect, all 20 host controls match what the plugin declares, it renders, Arena’s log stays clean, and all 14 valued controls and Arena’s own Opacity move the picture (against a noise floor of 0; Bridge Width and Min Island only just, at 0.25 and 0.30 levels, on the gate’s small thumbnail): 9 of the fleet Arena gate’s 9 checks, one run. The gate’s picture is a still, so it says nothing about how the bridges move; software rendering says nothing about a GPU or about speed. MSVC compiled it first time. Try it on a spare layer before you put it in a show.This codebase was created with AI assistance, directed and reviewed by a human author.
Installing
Every download carries one effect, SW Stencil. Drop it into Resolume’s effects folder and restart Resolume:
macOS    ~/Documents/Resolume Arena/Extra Effects/
Windows  %USERPROFILE%\Documents\Resolume Arena\Extra Effects\
Avenue uses the same layout under its own folder name. The effect then appears in the effects browser as SW Stencil.
The macOS download is a universal build (Apple silicon and Intel), as a .dmg or a .zip. It is Developer ID-signed and notarised (the downloaded .dmg and the bundle inside the .zip both read Notarized Developer ID), so the bundle simply loads. The Windows download is an x64 installer or a .zip. It is not
code-signed, so the installer trips SmartScreen once: More info → Run anyway.
How a stencil is cut
A stencil is a sheet with holes in it, and paint goes through the holes. Anything cut out completely — the middle of an O, the counter of an A, an island of light inside a shadow — falls out. So a stencil cutter leaves bridges: thin strips of sheet that tie every island to the rest. The plugin does the same:
| the mechanism | what comes out |
|---|---|
| each layer’s sheet is labelled into pieces; a piece that reaches the frame’s edge is held | islands: the counters of letters, light inside shadow |
| every island is tied by the shortest strip from it to any other piece | the gap in the O, where its ring is thinnest; split letters, segmented shadows |
| an island tied only to another island still floats, so it goes round again | islands inside islands, tied on one to the next until everything hangs off the frame |
| one threshold per layer, sprayed lightest first | n + 1 tones including the bare wall, dark over light, each layer with its own bridges |
| the holes sprayed through the disc of the nozzle’s footprint | the halo across every edge, its width in proportion to Distance |
| paint under a sheet that does not lie flat, most under a bridge | ghostly bridges when Lift is up |
| paint over what the wall can hold runs down | drips from the lower edges |
The tone that is cut is the clip’s luma laid over white paper, so dark is paint: a black part of the clip is sprayed, a white part is bare wall, and a transparent part of the clip is always bare wall, with Invert on or off.
Start here
Put SW Stencil on a layer or a clip. Out of the box you get two layers of the Mono cans on a concrete wall, cut at half tone with a little smoothing, bridges half a percent of the frame high, specks under 1.2% dropped, sprayed from close in with a little lift and a few drips.
Then:
- Mix → 0 and back. Compare the clip with the stencil. Look for the bridges: every enclosed bright shape inside a dark one is tied to the rest by a thin strip of wall.
- Layers → 1, then 3 and 4. One layer is the classic one-sheet stencil in the darkest can. More layers cut the tones under Threshold into more bands, each its own stencil with its own bridges, sprayed lightest first.
- Palette → Street, and Wall → Brick. Cream, signal red, charcoal and black on a brick wall.
- Distance → up. The nozzle moves back and the halo across every edge widens.
- Lift → 1. Paint creeps under the sheet; the bridges, which lift most, go ghostly.
- Bridge Width → up. Thicker ties; at the top they are 2% of the frame high.
- Invert on. Paint the light instead of the dark — the answer for a bright subject on black or on transparency, which otherwise paints nothing at all.
Every slider is declared to the host as 0 to 1. The value each position stands for is given with each control below. Layers is a whole number, 1 to 4, and Resolume shows it as one.
The Cut group
Layers (1 to 4, default 2). The number of stencils. Layer k of n paints where the tone is under Threshold × (n − k + 1) / n, so the n cuts divide the tones under Threshold evenly, and everything lighter than Threshold is bare wall. Each layer is cut and bridged on its own.
Threshold (0 to 1, default 0.5). The lightest cut, as a tone. Raise it to paint more of the picture; lower it to paint only the darkest parts.
Invert (default off). Flips the clip’s luma before it is cut, so the light is painted and the dark is wall. The paper does not flip: a transparent part of the clip is bare wall either way.
Smooth (0 to 1% of the frame height, default 0.3%). A Gaussian blur of the tone before it is cut. More smoothing gives rounder shapes, fewer specks and fewer islands, and so fewer bridges.
Bridge Width (0.1% to 2% of the frame height, geometric, default 0.5%, slider 0.537). How wide each bridge is cut. A bridge is a straight strip along the shortest gap and is never thinner than it needs to be to stay joined at a diagonal.
Min Island (0 to 5% of the frame height, default 1.2%, slider 0.24). An island whose area is smaller than this square is not bridged but dropped, as a cutter drops a speck: it falls out and is painted over.
The Spray group
Distance (0 to 2% of the frame height, default 0.3%, slider 0.15). How far the nozzle is from the wall, given as what it does to the paint: the radius of the cone’s footprint where it meets the wall. The paint across an edge is the fraction of that disc on the hole’s side, so the halo’s width is in exact proportion to Distance. At 0 the edges are hard, and at 4K they step (see Known limits).
Pressure (0 to 2, default 1.12, slider 0.56). Paint laid per unit of coverage. Above 0.9 — what the wall can hold — the excess runs as drips.
Lift (0 to 1, default 0.3). How far the sheet stands off the wall. Paint creeps under every edge, over a width up to 0.8% of the frame height, weighted by how lifted the sheet is there: a bridge lifts fully, the rest of the sheet about a third as much. So at high Lift the bridges read as ghostly lines rather than clean gaps.
Drips (0 to 1, default 0.4). The share of columns under over-saturated paint that run (up to 45%), and how far they run (up to 12% of the frame height), thinning to half at the tip. The drips are static: they appear with the paint rather than running down over time.
The Paint group
Palette (default Mono). The cans, four to a palette, lightest first; n layers take the darkest n, so one layer is always the palette’s darkest can:
| Mono | three greys and a near-black |
| Street | cream, signal red, charcoal, black |
| Sepia | a brown ramp |
| Pop | yellow, magenta, blue, black |
| Cool | ice, teal, navy, ink |
Every palette’s darkest can is a near-black, so with one layer the palettes look almost the same; they differ from two layers up. The cans are picked by eye.
Layer Colours (default Palette). From Clip paints each layer the clip’s own mean colour over that layer’s band of tone, instead of a can.
Wall (default Concrete). What is sprayed on: Clip (the clip itself is the wall, and the paint lands on it), Brick (stretcher bond), Concrete (with pits), or Plain (off-white). Brick, Concrete and Plain cover the whole frame, so the output is opaque at Mix 1. With Clip the clip’s own alpha is kept where no paint landed, and paint is opaque where it did.
Mix (0 to 1, default 1). The stencil over the clip.
How it works
Six stages a frame:
- Detect (GPU). The clip is reduced to a working lattice of at most 540 rows (one texel per pixel at 540 rows and under, 2 × 2 pixels at 720p and 1080p, 4 × 4 at 4K), its tone the luma over white paper, smoothed, and read back to the CPU.
- Cut (CPU), per layer: threshold; label the sheet into pieces (runs and union-find); drop the islands under Min Island; then passes of: a jump flood on the GPU finds, for every cell, the nearest sheet of a different piece; each floating piece takes its shortest bridge; the bands are cut. Until nothing floats. An island tied only to another island floats on, so the passes repeat; their number at least halves the floating pieces each time, so they are few.
- Spray (GPU): the holes gathered through the footprint’s disc, with exact areas.
- Creep (GPU): a blur of the holes under the sheet, when Lift is up.
- Settle (GPU): the paint laid, and the drips run down from where it is over-saturated.
- Composite (GPU): the wall, then each layer’s ink over it, lightest first, back up to the output raster.
Last frame’s bridges are kept. Re-cut from scratch every frame, a bridge on a curve would jump among near-ties from frame to frame. So a bridge from the last frame is kept, at the cell nearest where it was, while it is no more than one lattice cell longer than the shortest. On a still clip the bridges hold still. On a moving one they hold still in the frame until they fall too far behind, then step: on a slow pan the harness measured 1–7% of bridges changing from one frame to the next with keeping, against 2–90% without. In the release video’s slow pan (one still frame of the skulls moved a pixel every two or three frames), 3.9% of the stencil’s pixels changed from one frame to the next on average, against 10.3% of the source’s; that is a measurement of the take, not one of the harness’s checks.
Shortest, not strongest. Every bridge is exactly the shortest gap from its island to another piece of sheet (checked against brute force). A real cutter also bridges for strength and would give a big island a second bridge; this never does.
Performance
This is heavy for a VJ effect, and it is the bridging that costs: the jump floods on the GPU (every pass of every layer, with a read-back stall) and the cutter on the CPU. Measured by the offline harness on an M4 Max, macOS, on a machine shared with other work (so the same run moved by up to a factor of two between tries), best of three runs of 30 frames:
On the harness’s bench scene (blobs through letters, about 46 islands, at the defaults: two
layers), sntest --bench, 25 September 2026 in a quieter moment (three runs each):
| 1280 × 720 | 1920 × 1080 | 3840 × 2160 | |
|---|---|---|---|
| defaults (2 layers) | 9.5–11.4 ms | 14.9–16.3 ms | 15.4–17.0 ms |
| 1 layer | 7.8–9.1 ms | ||
| 4 layers | 31–33 ms |
At 1080p about 5.6–10 ms of the default is the floods and 4.6–4.9 ms the cutter on the CPU. Earlier runs on a busier machine read 13–26 ms at 1080p for the same scene.
On Resolume’s own demo clips at 1920 × 1080 (90 frames through sntest --pipe, less the
harness’s own frame input and output, about 9 ms a frame, measured by putting the bench scene
through both ways):
| clip | defaults (2 layers) | 1 layer |
|---|---|---|
| the skulls (NoHopeJustFear_44), busy, full frame | about 22 ms | about 12 ms |
| the tumbling sphere (Metalive 01) | about 14 ms | about 7 ms |
| three rings (Trinity_09) | about 9 ms | about 5 ms |
A 60 fps frame is 16.7 ms, so on a busy clip at 1080p the defaults take more than a whole frame, and on a simple one about half. The cost does not grow past 1080p (the lattice stops at 540 rows), but it grows with every layer and every island.
To make it cheaper:
- Fewer layers. Each layer is its own cut and its own floods; one layer costs about half what two do (measured above).
- A smaller lattice. The lattice is at most 540 rows, so 1080p and 4K cut at 960 × 540. On a 720p layer or composition the lattice is 640 × 360, well under half the cells.
- Fewer islands. More Smooth and a larger Min Island mean fewer islands, fewer bridges and fewer passes. A busy clip (the skulls) costs far more than a simple one (three rings).
Why the default is two layers. One layer would be the cheaper default, but every palette’s darkest can is a near-black, so at one layer the Palette control would do almost nothing and the stencil would lose its dark-over-light tones. Two layers are the fewest that show what the plugin is; one is a click away.
Nothing was timed inside Resolume, where the read-back is a stall the host waits for, and nothing was timed on Windows.
If it looks wrong
Nothing is painted. Dark is paint: a bright subject on black or on transparency paints nothing. Turn Invert on, or raise Threshold.
Almost everything is painted. A dark, opaque clip paints most of the frame at the defaults. Lower Threshold, or turn Invert on.
The bridges jump. On a moving clip a kept bridge holds still in the frame until it falls a cell behind the shortest, then steps. More Smooth and a larger Min Island mean fewer, steadier islands.
The palettes all look the same. At one layer every palette sprays its darkest can, a near-black. Use two layers or more.
The edges step at 4K. The lattice stops at 540 rows, so a texel is 4 pixels at 4K. Raise Distance a little to soften them.
The clip’s transparency is gone. Brick, Concrete and Plain walls cover the frame. Use Wall → Clip, or lower Mix.
SW Stencil is not in the effects browser. Check the folder under Installing, and that Resolume was restarted.
The effect does nothing at all. A shader that will not compile looks exactly like that, and the real message is in the log:
macOS    ~/Library/Logs/stencil/stencil.YYYY-MM-DD.log
Windows  %LOCALAPPDATA%\stencil\logs\stencil.YYYY-MM-DD.log
It records the GL vendor, renderer and version at load, and which shader failed if one did.
Known limits
- Heavy. See Performance: more than a 60 fps frame at 1080p on a busy clip at the defaults.
- The lattice stops at 540 rows, so at 4K every texel is four pixels and, with the spray at its sharpest, the edges step.
- One bridge per island per pass, always the shortest. No second bridge for strength; a big island can hang by one thin strip.
- Bridges step on moving footage. Kept bridges hold still in the frame, not on the content; they lag, then step (see How it works).
- The drips are static, not running over time.
- Lift, the drips, the walls and the palettes are chosen to look right, not measured against anything.
- What filming the release video found, on Resolume’s demo clips through the harness: a bright subject on black or on transparency (the fire of Ethnik2_23) paints nothing at the defaults, because dark is paint; with Invert on at the default Threshold most of the dark demo loops paint only their brightest specks, so raise Threshold with it; and at the default Pressure (1.12, over the wall’s 0.9) a fringe of drips hangs from the lower edges of solid paint (18% of columns run), rather than a few runs — lower Pressure under 0.9 or Drips to 0 for clean edges.
- Never loaded into Resolume on macOS. Everything numeric was compiled, rendered and measured
offline against the real plugin class in a headless CGL context, plus an
oxbowload. - Never seen on camera footage, only on Resolume’s bundled CG loops.
- Only ever run on an Apple M4 Max, although the macOS build contains an Intel slice.
- No presets and no OpenFX version.
- There is a browser demo at stencil-demo.stoatworks-labs.com.
It is a port to a web page, not the plugin: the shaders are the plugin’s own, run in WebGL2, jump flood
included, but the CPU half — the union-find cutter in
Bridge.cpp— is a hand port to JavaScript that only a reader checks. It was compared with the C++ once and cut byte-for-byte the same grids (990 bridges over 48 random streams, and the page’s own frames); the page lists what it does not reproduce (Layers is a menu, there is no About group).
About
The last group, About, carries the plugin’s name, version, licence and maker, and buttons that open this user guide (stoatworks-labs.com/software/stencil/guide/), the project page, the source on GitHub and the support page in your browser.
Reporting something
github.com/stoatworks-labs/stencil/issues. A screenshot, the Cut and Spray settings, and the composition’s resolution and frame rate are usually enough. If the effect did nothing, attach the log.