

Tilter is a tilt-shift lens for Resolume Arena and Avenue, as an FFGL plugin — and the same thing again as an OpenFX plugin for Resolve, Nuke, Natron and Vegas. It puts a shallow plane of focus across your footage and a real aperture behind it, which is the trick that makes a city look like a model railway.
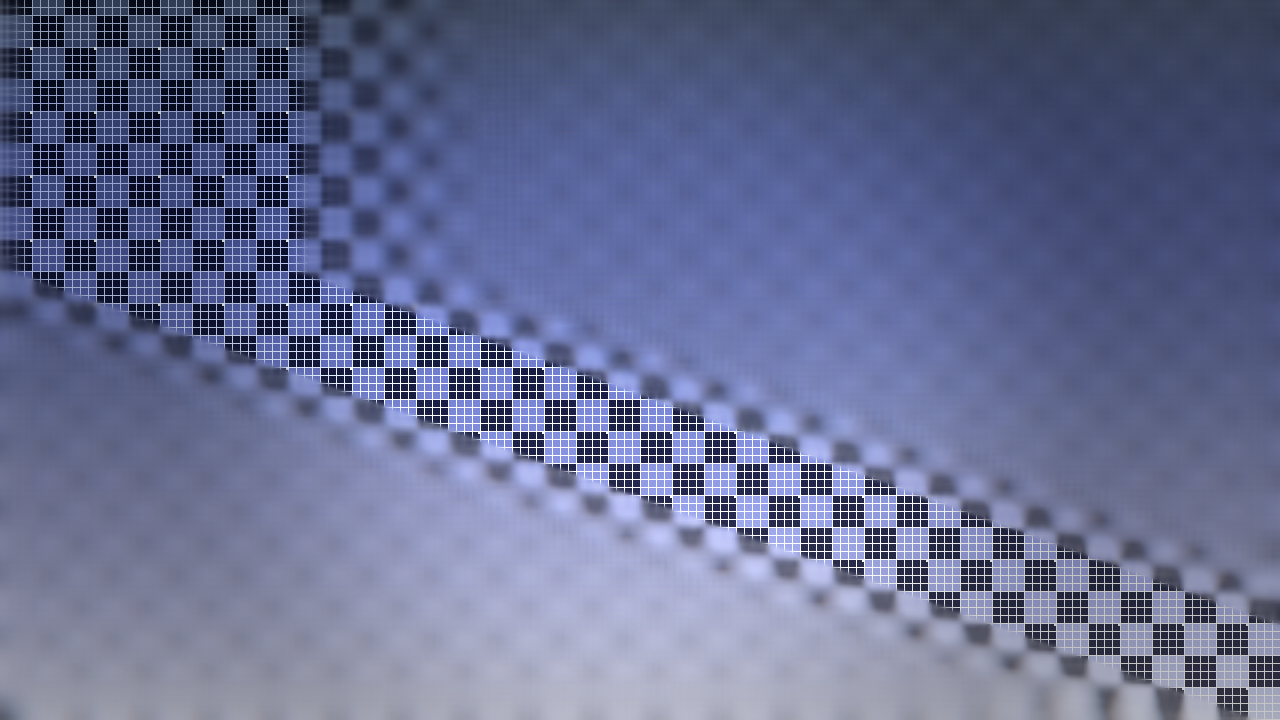
The Tilted Plane shape with Tilt off neutral: the plane of focus is swung about the viewing axis, so the sharp zone converges across the frame instead of lying parallel to the horizon.
Before you rely on this: the circle-of-confusion field the GPU writes is compared against an independent implementation across all four focus shapes, and the three analytic ones agree at exactly the 16-bit-float quantum — as close as the buffer can represent — with a control case comparing against the wrong shape, which must and does disagree. The aperture is measured in the rendered frame: a circular iris spreads a highlight over the disc its radius predicts, six blades cover 0.87 of that area, and halving the radius quarters it.
It has been loaded into Resolume Arena and confirmed working. The OpenFX build has never been opened in Resolve — only driven by a test probe — the Windows build is made in CI and has never been run, and none of it has been used on a live show.
This codebase was created with AI assistance, directed and reviewed by a human author.
Installing
macOS    ~/Documents/Resolume Arena/Extra Effects/
Windows  %USERPROFILE%\Documents\Resolume Arena\Extra Effects\
For OpenFX hosts, copy Tilter.ofx.bundle into /Library/OFX/Plugins (macOS),
C:\Program Files\Common Files\OFX\Plugins (Windows) or /usr/OFX/Plugins
(Linux). The macOS builds are signed and notarised.
The one idea
It works out how far each pixel is from focus, and then a blur consumes that. The two halves are independent, so you pick the shape of the focus and the character of the blur separately, and neither constrains the other.
Turn on Show Focus while you place the plane. It paints the field over the picture, so you can place a focal plane by looking at it rather than by squinting at softness. Then turn it off.
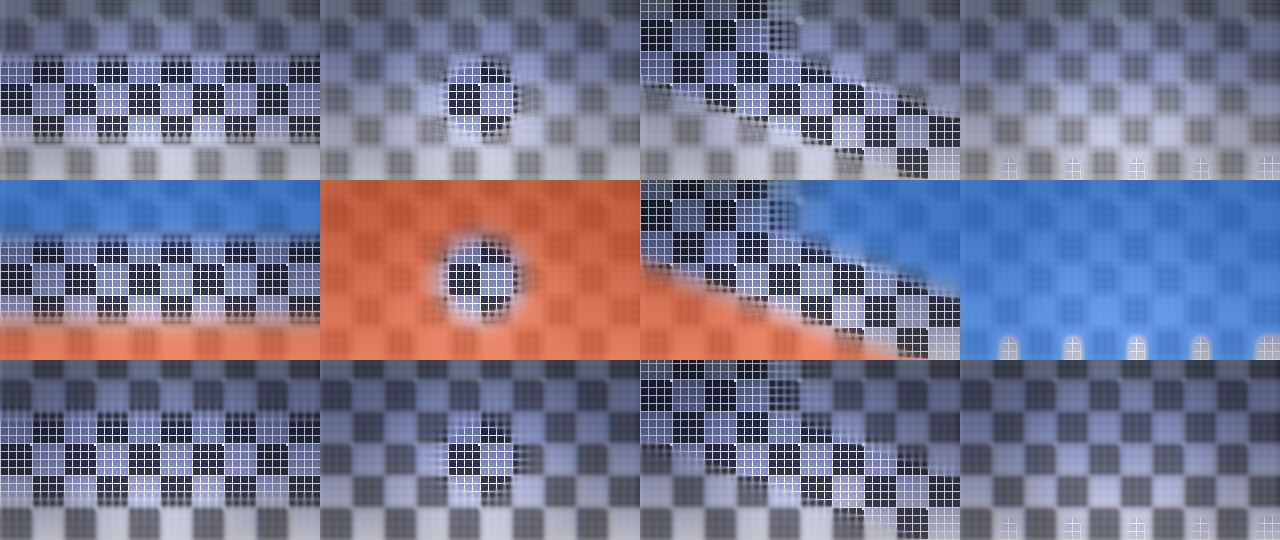
Top row: the four focus shapes through the bokeh path. Middle: the same four fields under Show Focus — cold is the far side of focus, warm is the near side. Bottom: the same four again through the cheaper Gaussian path.
Four ways to choose what is sharp
| Shape | What it is |
|---|---|
| Linear Band | The classic. A sharp strip at any angle, feathered either side. |
| Radial | A sharp ellipse — for a subject in the middle of frame rather than a horizon. |
| Tilted Plane | A real lens’s falloff, with a horizon. |
| Image Depth | Guesses depth from the picture itself. Honestly a guess. |
Tilted Plane is the one worth understanding, and it is not simply a differently-shaped Linear Band — for a flat subject a real tilted lens’s sharp region is exactly a straight band. What it gives you is the falloff.
A real lens blurs by the difference in inverse depth, and nothing is further away than infinity. So on the far side the blur ramps up and then stops at the horizon, and the sky, the distant hills and the backs of the buildings all share one blur. On the near side it grows without limit.
A plain linear band ramps symmetrically and forever in both directions — and that asymmetry is the thing people’s eyes pick up on when a fake tilt-shift looks wrong.
Tilt then swings the focal plane so the sharp zone converges across the frame, the way it does in a real tilt-shift photograph.
Image Depth is labelled a guess in the dropdown because it is one. Distance scatters light: contrast washes out and brightness lifts, so smooth bright regions are treated as far away and detailed dark ones as near. That is right often enough to be useful on landscape and cityscape footage, and wrong on anything with a bright foreground or a dark sky. There is no depth channel coming out of Resolume, so this is inference from the picture and nothing more.
Two blurs
Bokeh Disc gathers over a real aperture — circular, or 5 to 9 blades — and weights each sample by its own brightness, so highlights bloom into visible aperture shapes instead of smearing. That is the whole reason to stop a lens down, and the reason this mode exists.
Gaussian is the cheap one: two separable passes, clean and fast, but a bright point spreads into a soft blob rather than a disc.
Either way the blur runs on a box-downsampled copy of the picture at a scale chosen from the radius. That is not only for speed — a sparse gather aliases its own source, and the artefact gets worse as the blur gets larger, which is the opposite of what anyone expects.
One known limit, and it is the method rather than a bug: an isolated highlight of only two or three pixels will not form a clean bokeh disc, because a gather blur takes too few samples of it. Highlights of roughly ten pixels and up bokeh correctly.
The rest of the photograph
Saturation and Contrast push the picture the way a photograph of a small, brightly lit object looks. Both matter more than they sound for the miniature effect — a model is usually lit harder and more saturated than a city.
Vignette and Aberration are the lens. Aberration scales with defocus and reverses across the plane of focus, because that is what real glass does — which means it also quietly reinforces where the sharp zone is.
If it looks wrong
It reads as a blurred photograph, not a miniature. Almost always the falloff. Switch to Tilted Plane — the symmetric ramp of a Linear Band is the usual tell.
The highlights smear instead of forming discs. You are on Gaussian, or the highlights are only a few pixels across. See the note above.
Image Depth puts the sharp zone in the wrong place. It is inferring depth from brightness and contrast. On footage with a bright foreground or a dark sky it will be wrong; use one of the three analytic shapes.
I cannot tell where the plane is. Turn on Show Focus. That is what it is for.
It is slow at 4K. The blur radius and the bokeh path are what you are paying for. Gaussian is the cheap path, and reducing the radius costs less than reducing quality elsewhere.