

Toolpath is CNC pocketing for Resolume Arena and Avenue, as an FFGL effect. It treats the bright part of your clip as a pocket to be cleared from a block of stock with a round cutter, works out the passes a CAM program would, and then runs the tool along them at a feed rate, cutting a disc wherever it goes. Nothing about a machined part is drawn on: the rounded inside corners, the slot too narrow to enter and the ridges a wide stepover leaves are all the geometry of a round tool doing what it does.
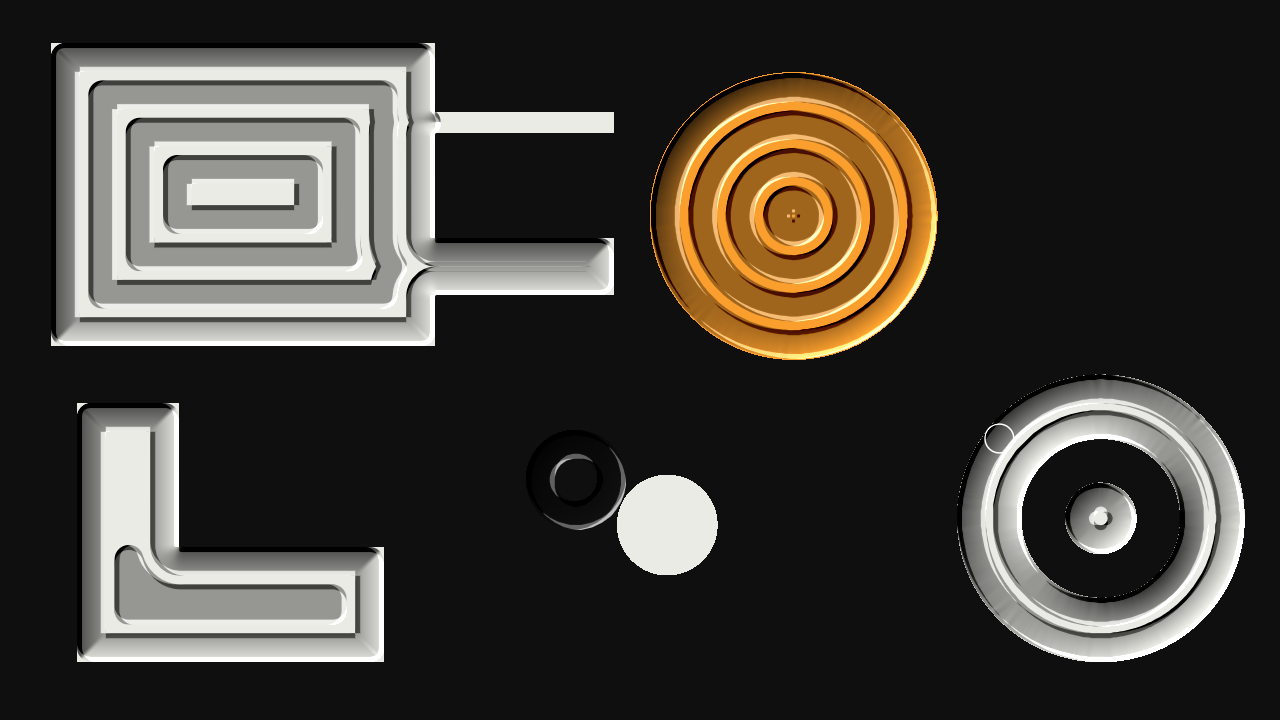
The repo’s test card through the plugin in Engrave mode, rendered by the offline harness rather than captured from Resolume. The stepover is at 1.3 tool diameters so the ridges show, six and a half seconds into the job. The thinner of the two slots off the rectangle is narrower than the tool and has not been touched. The small dark ring beside the white disc is where that disc was when the job was grabbed: the disc has moved on, and the tool is still cutting where it used to be.
Before you rely on this: released at v0.1.0, and honestly early. The machining is measured rather than asserted, by a harness that drives the real plugin class and reads each claim back out of the plugin’s own distance field or out of the picture: the field is exact to 6 ULP on straight-walled shapes and within 1.05 px of an exact distance transform on curved ones at 4K (0.58 px at 720p), against a bound of 2.83 px; a square pocket’s inside corners keep a fillet of radius 8.981 for a tool radius of 9 px and 36.002 for 36; a slot 2 px narrower than the tool has 0 pixels cut past the tool’s reach from its mouth, and one 5 px wider is cut from end to end; past a stepover of one tool diameter the ridges left are the width the geometry predicts to within 0.15 px; the tool covers 90.000000 px of path a second for a Feed of 90 px a second, at 60 and at 30 fps; and eight deliberate faults are shown to make those checks fail. All 25 controls are shown to change the picture. It has never been loaded into Resolume on macOS — the one host it has run in is the fleet’s own test host,
oxbow, for 120 frames. On Windows, a build of v0.1.0 loads, registers and renders in Resolume Arena 7.27.1, with every control matching what the plugin declares — on software rendering, so that says nothing about a GPU. Some controls could not be shown moving there at the gate’s thumbnail size, and which ones changed from run to run; the harness sweep shows every one of them live. Try it on a spare layer before you put it in a show.This codebase was created with AI assistance, directed and reviewed by a human author.
Installing
Every download carries one effect, SW Toolpath. Drop it into Resolume’s effects folder and restart Resolume:
macOS    ~/Documents/Resolume Arena/Extra Effects/
Windows  %USERPROFILE%\Documents\Resolume Arena\Extra Effects\
Avenue uses the same layout under its own folder name. The effect then appears in the effects browser as SW Toolpath.
The macOS download is a universal build (Apple silicon and Intel), as a .dmg or a .zip. It is
Developer ID-signed and notarised, so the bundle simply loads. The
Windows download is an x64 installer or a .zip. It is not code-signed, so the installer trips
SmartScreen once: More info → Run anyway.
One distance field is the whole job
A router clears a pocket with a round tool. The centre of the tool can only go where the whole disc fits inside the pocket, and what gets removed is everywhere the disc has been. So the path a CAM program writes is a set of offset outlines of the pocket: one a tool radius in from every wall, the next a stepover further in, the next a stepover further again, until there is no room left.
Every one of those outlines can be read off a single picture: the pocket’s distance field, which says, for every pixel, how far it is from the nearest wall. The first pass is everywhere the field reads one tool radius; the second is where it reads a radius plus a stepover; and so on. Toolpath computes that field from your clip on the GPU, traces the outlines into an ordered job, and drives the tool along it.
Because the tool is round and the passes are offsets, the things a machinist would recognise fall out without anything drawing them:
- Inside corners come out rounded, with a fillet of exactly the tool’s radius. The disc cannot reach any further into a corner.
- A slot narrower than the tool is never entered. There is nowhere inside it a whole disc fits.
- A stepover wider than the tool leaves ridges of stock standing between the passes, because each pass only clears a band one tool diameter wide.
- A big pocket takes longer than a small one. The tool moves at Feed, and a big pocket is more path.
The same distance field also makes a glow, a bevel or an outline at any distance from the shape, with no machining at all. That is Mode → Field.
Start here
Put SW Toolpath on a layer with something bright on a dark background: white text, a logo, simple shapes. Leave every control alone. The defaults take the bright part of the clip once, on the first frame, and clear it outside in with a tool 4% of the frame high at a stepover of 0.45 tool diameters, moving at 0.6 frame heights a second, through aluminium-grey stock. The whole frame turns into stock, and the tool (a white ring) starts to cut the clip back out of it. When the job is finished, the finished part stays on screen.
On ordinary footage, lower Threshold first. The default Threshold of 0.5 on Luma takes only the parts of the picture brighter than mid-grey, and on most footage that is just the highlights, so most of the frame is never pocket. For darker footage bring Threshold down until the region you want is caught (in Paths you can see what it takes), or turn on Invert to cut the dark part instead, or set Detect On to Chroma to cut the coloured part. Then press Restart: a latched job only looks at the clip again then.
Then, in this order:
- Restart. Grabs the clip’s current frame again, clears the part and starts a new job. Press it whenever the clip has changed and you want the tool to cut what is there now.
- Mode → Paths. The CAM preview: every pass as a line, the rapids between pockets as faint straight lines, and what has been cut so far tinted. This is the job the tool is running.
- Stepover → past halfway (above one tool diameter). Ridges of uncut stock appear between the passes. Tool Diameter down gives more, finer passes and lets the tool into narrower slots.
- Mode → Engrave. The clip everywhere, with the cut sunk into it and lit, and a bevel rising to the pocket’s walls.
- Geometry → Live. The region is taken from every frame, so the pocket follows a moving clip, and the tool re-cuts the current path from its start, over and over, with a one-second hold on the finished part each time round.
- Mode → Field, then Field Mode → Glow or Outline and raise Distance. A glow or a line at a set distance from the shape, straight from the field.
Lengths are frame heights; time is seconds
Every length in the plugin — the tool, the Smooth blur, Field mode’s Distance and Width — is a fraction of the frame’s height, not a number of pixels. A tool 4% of the frame high is the same tool at 720p and at 4K, so the look does not change when the composition’s resolution does. Stepover is in tool diameters, CAM’s own unit.
Feed is in frame heights per second of the host’s clock, not per frame. At the default of 0.6 the tool covers 648 px of path a second in a 1080p composition, whether that composition runs at 30 fps or 60. A frame that takes longer than a quarter of a second to arrive only moves the tool on by a quarter of a second’s worth.
The tool follows the clock Resolume gives the plugin. What that clock does to a job in progress when a clip is retriggered or the composition is paused has not been seen in Resolume.
Latch and Live
Geometry decides when the plugin looks at the clip.
- Latch (the default) takes the region once — on the first frame after the effect loads, when you press Restart, and when you switch Geometry to Latch — and machines that shape. The tool advances along the job a little every frame and the cut builds up, like a real part. The clip can do whatever it likes meanwhile: Reveal and Engrave show the clip as it is now through the cut, but the cut is the shape the clip had when the job was grabbed. When the job ends, the part holds until Restart.
- Live takes the region from every frame, plans a new job every frame, and cuts the current job’s path from its start as far as Feed has taken the tool since the sweep began. The pocket follows the clip. When the tool reaches the end, the finished part holds for one second and the sweep starts again.
An effect cannot see a clip being retriggered, so Latch does not re-grab when one is. Press Restart.
In Latch, changing Tool Diameter, Stepover or Strategy mid-job re-plans the path from the same latched shape and carries on from the same point in the job; what is already cut stays cut. Changing a Region control does nothing to a latched job until you press Restart, because the region is not looked at again until then.
A latched job keeps the resolution it was grabbed at. If the composition changes size, the part is stretched onto the new frame rather than thrown away.
The Region group
What counts as the pocket.
Detect On — which property of the clip is measured:
| Detect On | What it measures |
|---|---|
| Luma | The default. Brightness, with the clip’s alpha divided out first, so a soft alpha edge does not read as a brightness ramp. The bright part is the pocket. |
| Alpha | The clip’s alpha. The opaque part is the pocket. |
| Chroma | How far each pixel’s colour is from its own grey, plus a quarter of its brightness. A saturated colour reads high; a white reads only 0.25, so at the default Threshold it is not a pocket. |
| Luma or Alpha | Alpha × (0.35 + 0.65 × luma). Transparent is 0, opaque black 0.35, opaque white 1. At the default Threshold of 0.5 an opaque dark mark is not a pocket: take Threshold under 0.35 to count every opaque pixel. |
Threshold — 0 to 1; 0.5 by default. A place is pocket when the measured value is above this. The decision is made on a lattice of two pixels by two: a 2×2 block is pocket when its average is above Threshold, which for a clean-edged shape means when more than half of it is.
Invert — off by default. Swaps pocket and stock: the dark part becomes the pocket. The edge of the frame always counts as a wall, so an inverted picture of bright shapes on black is one big pocket bounded by the frame, with the shapes standing in it as islands.
Smooth — 0 to 1; 0.2 by default. A Gaussian blur of the measured value before the threshold, from none up to a blur of 1% of the frame height (the default is 0.2%, about 2 px at 1080p). It rounds off the region’s corners and removes specks, which on real footage would each become a pocket or an island of its own. A blur of under about 0.6 px is not applied at all, so at small compositions the low end of the slider does nothing.
The Tool group
The cutter and the job.
Tool Diameter — 1% to 25% of the frame height; 4% by default. The slider is geometric: its middle is 5%. The tool’s size sets everything: how far the first pass sits from each wall (one radius), how round the inside corners come out (one radius), and how narrow a slot can be before the tool will not go in (one diameter). A bigger tool clears a pocket in fewer passes and leaves more of its detail uncut.
Stepover — 0.1 to 2 tool diameters, linear; 0.45 by default. How far apart the passes are. Up to 1.0 each pass overlaps or meets the last and the pocket floor is cleared. Above 1.0 (the middle of the slider is 1.05) the passes stop touching and a ridge of stock stands between each pair; at 2.0 the ridges are a whole tool diameter wide. Small stepovers mean many passes and a slower job.
Strategy — the order the passes are cut in.
| Strategy | What it does |
|---|---|
| Outside In | The default. Each pocket’s outermost pass first, working in towards the middle. |
| Inside Out | Each pocket’s innermost passes first, working out to the wall. |
Either way the job goes pocket by pocket: one pocket is finished before the tool moves to the next, the nearest one first, starting from the bottom-left corner of the frame. Between passes and between pockets the tool makes a rapid: it lifts, crosses in a straight line at four times Feed, and cuts nothing.
Feed — 0.05 to 8 frame heights a second; 0.6 by default. The slider is geometric: its middle is about 0.63. The tool’s speed along the path while it is cutting. Double it and the same job takes half as long. See Lengths are frame heights; time is seconds above.
Restart — a button. In Latch: grab the clip’s current frame as the new region, clear the part and start the job from the beginning. In Live: start the sweep again from the beginning of the path.
Geometry — Latch (the default) or Live. See Latch and Live above.
The Render group
What the output looks like.
Mode — what is drawn:
| Mode | What you see |
|---|---|
| Reveal | The default. The frame is solid Stock Colour; wherever the tool has cut, the clip shows through, with the walls of the cut shaded by the light. Uncut stock is opaque, whatever the clip’s alpha. |
| Engrave | The clip everywhere, with the cut sunk into it: the floor of the cut darkened, its walls catching the light or in shadow, and within a tool diameter of the pocket’s own wall the floor rising in a bevel. |
| Paths | The CAM preview. The clip dimmed to about a third, every cutting pass drawn as a line in Path Colour, the rapids as fainter, darker lines, and what has been cut so far tinted with Path Colour. |
| Field | No machining. A glow, bevel or outline straight from the distance field, set by the Field group. The tool does not move in Field mode: a latched job pauses, and carries on when you switch back. |
Stock Colour — the colour of the uncut stock in Reveal; aluminium grey (0.62, 0.64, 0.67) by default. It is declared as a colour, so a host can show it as a swatch. Only Reveal uses it.
Depth — 0 to 1; 0.5 by default. How deep the cut looks: how strongly its walls are lit and shaded in Reveal and Engrave, how dark Engrave’s floor is, and how strong Engrave’s bevel and Field mode’s Bevel are. At 0 the cut is flat, and Engrave shows the clip unchanged. Paths, Glow and Outline ignore it.
Light Angle — the direction the light comes from, once round the circle over the slider; 135°, from the top left, by default. Both ends of the slider are the same light. Used by Reveal, Engrave and Field mode’s Bevel.
Path Colour — the colour of the passes and the tint of what is cut in Paths, and of the glow and the outline in Field mode; cyan (0.20, 0.85, 1.00) by default. It is a colour, like Stock Colour.
Show Tool — on by default. Draws the tool as a white ring its own diameter wide, where it is now, in Reveal, Engrave and Paths. It is never drawn in Field mode. When a latched job is finished, the ring rests at the end of the path.
The Field group
These act only when Mode is Field. The field follows Geometry like everything else: in Latch it is the field of the region grabbed at the start of the job, not of the clip as it plays, so a glow on a moving clip stays where the clip was. Field mode only follows moving footage in Live, or catches up once each time you press Restart.
Field Mode — which effect:
| Field Mode | What it draws |
|---|---|
| Glow | The default. Path Colour added to the clip outside the region, starting Distance out from its edge (solid between the edge and there) and falling away over about Width. Nothing is added inside the region. The glow also raises the output’s alpha where it is drawn. |
| Bevel | Inside the region, a slope Width wide starting Distance in from the edge, lit from Light Angle, as strong as Depth says. The clip’s own colours are shaded; nothing is added. |
| Outline | A line in Path Colour, Width wide, Distance outside the region’s edge. It raises the output’s alpha where it is drawn. |
Distance — 0 to 25% of the frame height, linear; 0 by default. How far from the region’s edge the effect starts: outwards for Glow and Outline, inwards for Bevel.
Width — 0.2% to 10% of the frame height; 2% by default. The slider is geometric: its middle is about 1.4%. How far the glow falls away, how wide the bevel’s slope is, how thick the outline is.
Falloff — 0 to 1; 0.5 by default. Shapes the effect’s profile. For Glow, at 0 it falls away as a Gaussian — full near the edge, then gone — and at 1 as an exponential, with a longer tail. For Bevel, 0 is a straight chamfer and 1 bends it towards a round-over. For Outline, it softens the line’s edges; at 0 they are as hard as a pixel allows.
The Output group
Mix — the effect against the untouched clip; 1 by default. Zero is the clip as it arrived. The job keeps running underneath whatever Mix says, so bringing Mix back up shows the part as it has been cut all along.
How it works
Whenever a region is grabbed — every frame in Live, once per job in Latch:
- Detect. Measure the clip (Detect On) on a lattice of two pixels by two, averaging each block, blur it (Smooth), and threshold it (Threshold, Invert). Every point is now pocket or stock.
- Flood. A jump flood on the GPU finds, for every point, its nearest point of the other kind: a first pass one step wide, then passes at halving distances from about half the frame’s longer side down to one, then a short second run of halving steps to repair the flood’s known mistakes on curves. Distances are compared as exact integers, so the result is the same on any GPU.
- Resolve. Turn that into the distance field: inside the pocket, how far to the nearest wall (the frame’s edge counts as one), in pixels; outside, minus how far to the pocket.
Then, whenever the job or the tool changes:
- Trace. Read the field back to the CPU and trace its outlines at one tool radius, a radius plus a stepover, and so on, by marching squares, on a grid of at most 1280 samples across. Put back the sharp corners marching squares shaves off, and simplify each outline to within 0.2 px.
- Order. Arrange the outlines into a job, one pocket at a time, outside in or inside out, entering each at the point nearest the tool, with rapids between.
And every frame:
- Cut. Move the tool along the job at Feed and stamp its disc along every piece of path it covered into the cut buffer — the part. A pixel the tool passes twice is no more cut than one it passes once. In Latch the cut buffer persists from frame to frame; in Live it is redrawn from the start of the path every frame.
- Composite the clip, the cut and the field into the output for the Mode you have chosen, with the passes and the tool drawn over it, and mix against the clip at Mix.
No corner, slot or ridge is known about anywhere in this. They come out of the passes and the round stamp.
Performance
Measured by the offline harness on an M4 Max at the defaults, on the test card, best of three runs of 60 frames, on a GPU shared with other work, in milliseconds per frame:
| Latch | Live | of which the field (GPU) | of which trace and order (CPU) | |
|---|---|---|---|---|
| 1280×720 | 0.08 | 6.5 | 1.8 | 4.6 |
| 1920×1080 | 0.12 | 7.3 | 2.6 | 4.5 |
| 3840×2160 | 0.16 | 9.0 | 2.9 | 4.7 |
Latch is nearly free once a job is running: it pays for the field and the trace once, when the job is grabbed, and after that a frame is a few stamps and a composite. It pays for the trace again whenever Tool Diameter, Stepover or Strategy changes, so dragging one of those sliders costs about 4.5 ms on the test card on each frame it moves. Live pays for both every frame — at 4K a little over half of a 60 fps frame, the larger share of it on the CPU. The trace’s cost was measured on the test card’s handful of clean shapes; a thresholded piece of real footage with many specks makes more outlines, and what that costs has not been measured.
The buffers the plugin keeps come to up to about 29 MB at 1080p and 103 MB at 4K, worked out from what it allocates rather than measured. Nothing was timed inside Resolume, and nothing was timed on Windows.
If it looks wrong
The whole frame is grey. That is Reveal before the tool has cut anything. If it stays grey, there is no pocket: nothing in the clip was above Threshold on the frame the job was grabbed (the first frame the effect saw may have been black), or it is all narrower than the tool. Lower Threshold, try another Detect On, or turn on Invert — and then press Restart, because in Latch the region is only looked at again then.
Changing Threshold, Detect On, Smooth or Invert does nothing. Geometry is on Latch, which took the region once. Press Restart after changing them, or switch to Live while you set them up.
The cut is not where the clip is. Latch cut the shape the clip had when the job was grabbed; the clip has moved or changed since. Press Restart, or use Live.
The tool has stopped and nothing moves. A Latch job is finished and holds the part. Press Restart. Or Mode is on Field, which pauses the tool.
A narrow part of the shape is never cut. It is narrower than the tool — that is the slot the tool cannot enter. Lower Tool Diameter. Anything narrower than about two pixels, such as a one-pixel line, is never part of the pocket at all.
Stripes of stock are left between the passes. Stepover is above one tool diameter. Bring it to 1.0 or below, just under the middle of the slider.
A small island of stock is left in the middle of a pocket. The last pass fell short of the middle, and there is no finishing pass. A slightly different Tool Diameter or Stepover usually moves it or clears it.
The corners of the region look stepped. The region is decided on a lattice of two pixels by two. Raise Smooth.
On footage, the job is hundreds of tiny pockets. Every speck above Threshold is a pocket and every speck below it inside a pocket is an island. Raise Smooth and move Threshold, or use a cleaner source: a matte, a logo, a key.
The glow does not follow the clip. Field mode follows Geometry: in Latch it draws the field of the grabbed region, not the live clip. Set Geometry to Live, or press Restart to catch it up once.
Only the highlights are cut, or only a few specks. The default Threshold of 0.5 on Luma takes only what is brighter than mid-grey, which on ordinary footage is little of the frame. Lower Threshold, or turn on Invert to cut the dark part, or set Detect On to Chroma to cut the coloured part, and press Restart.
The glow or outline is invisible. Check Path Colour is not close to the clip’s own colours, and that Width is not at the very bottom. A Bevel needs Depth above 0.
Frame rate drops. Live at 4K, or a sweep of Tool Diameter or Stepover in progress. Use Latch where the clip does not need following.
SW Toolpath is not in the effects browser. Check the folder under Installing, and that Resolume was restarted.
The effect does nothing at all. A shader that will not compile looks exactly like that, and the real message is in the log:
macOS    ~/Library/Logs/toolpath/toolpath.YYYY-MM-DD.log
Windows  %LOCALAPPDATA%\toolpath\logs\toolpath.YYYY-MM-DD.log
It records the plugin’s build at load, the GL vendor, renderer and version, which shader failed if one did, a buffer that could not be allocated, and at frame 60 the host’s clock reading and the unit the plugin has settled on for it.
Known limits
- Never loaded into Resolume on macOS, and nothing has driven the controls in a host. How the 25 controls in five groups, the colour swatches and the Restart button present in the inspector is untested, as is what Resolume’s clock does to a latched job across a clip retrigger, and whether a Live job at 4K keeps up inside Resolume’s own frame.
- Only ever seen on a synthetic test card, never on footage.
- The region is taken on a lattice of two pixels a side. Its walls are two-pixel steps, a wall that falls half way across a block moves a pixel into the pocket (never out), and anything narrower than the lattice — a one-pixel line, a single pixel — is not seen at all.
- The distance field is not exact everywhere: it is exact on straight walls and within 2.83 px on curves (1.05 px was the worst measured, at 4K).
- The passes are traced on a grid of at most 1280 samples across, so above 1280 wide a pass is placed to within one sample of that coarser grid.
- One tool, one depth. No ramping or plunging, no choice of climb or conventional cutting, and no finishing pass along the middle of a pocket, so a pocket whose last pass falls short of its middle keeps an island there, as a real job without a clean-up pass would.
- Rapids are only drawn in Paths. They cut nothing, so in Reveal and Engrave the only sign of one is the tool’s ring crossing, if Show Tool is on.
- Latch cannot see a clip retrigger. Press Restart.
- Only ever measured on one Apple silicon Mac. The macOS build contains an Intel slice, and nothing here says it has been run.
- No presets and no OpenFX version.
- There is a browser demo at toolpath-demo.stoatworks-labs.com. It is a port to a web page, not the plugin: the shaders run in WebGL2 and any CPU half is rewritten in JavaScript. The page lists what it does not reproduce.
About
The last group, About, carries the plugin’s name, version, licence and maker, and buttons that open this user guide, the project page, the source on GitHub and the support page in your browser.
Reporting something
github.com/stoatworks-labs/toolpath/issues. A screenshot, the Mode, Geometry, Tool Diameter and Stepover settings, what the clip is, and the composition’s resolution and frame rate are usually enough. If the effect did nothing, attach the log.